Author: Matt

  • Magnetize Space Marine Kratos Tank

    Magnetize Space Marine Kratos Tank

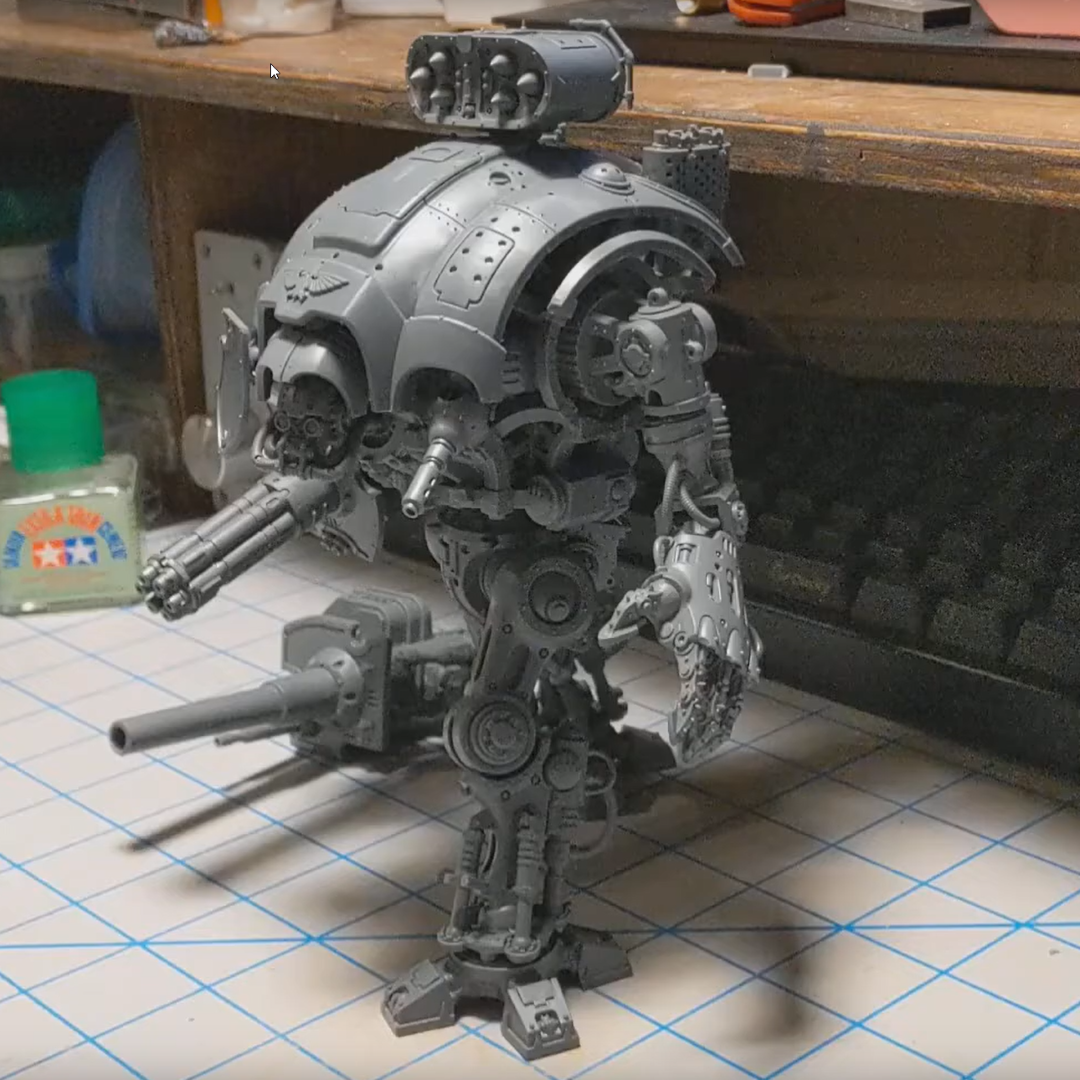
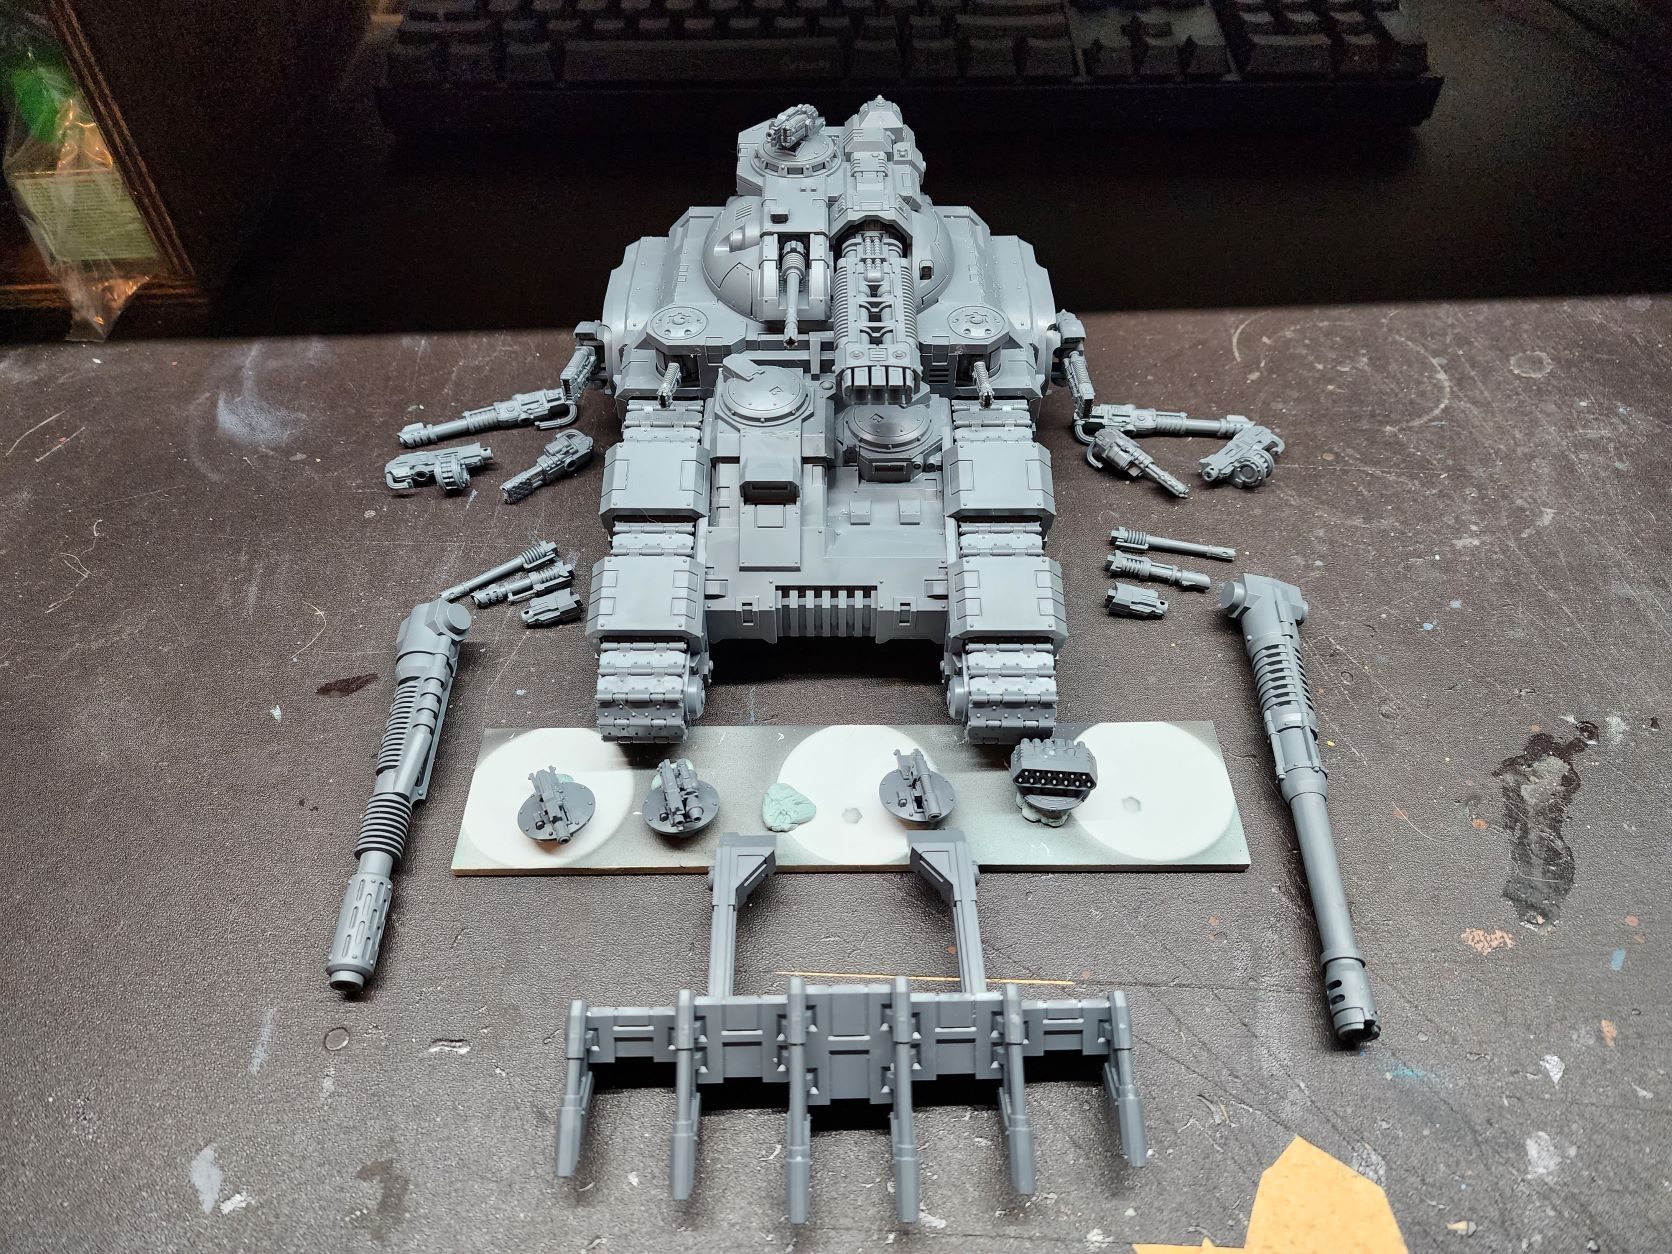
    Whomever designed the Kratos kit at Games-Workshop really understands their customers. It doesn’t even need much magnetization to keep all the loadout options available. Really only the top plate of the turret needs magnets. Everything else can just be swapped out securely enough.

    The whole kit laid out

    Hull Weapons

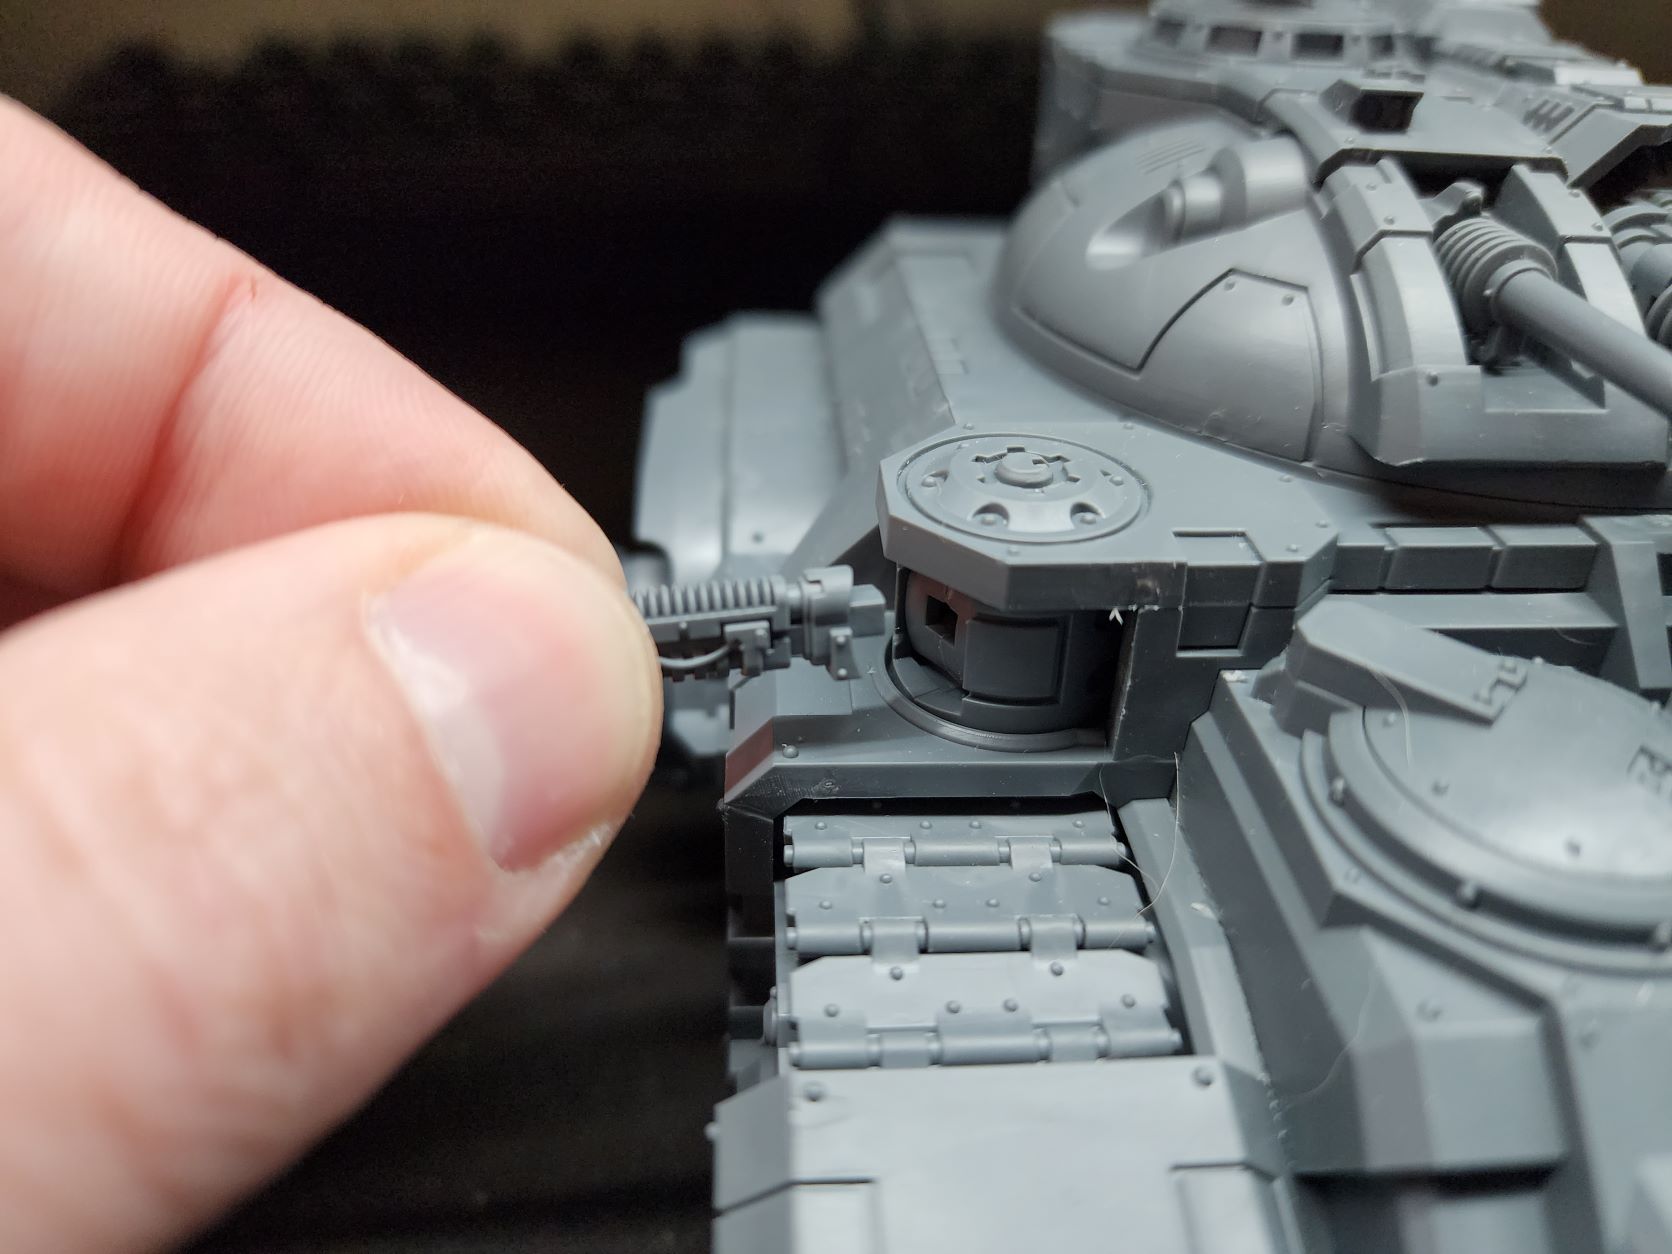
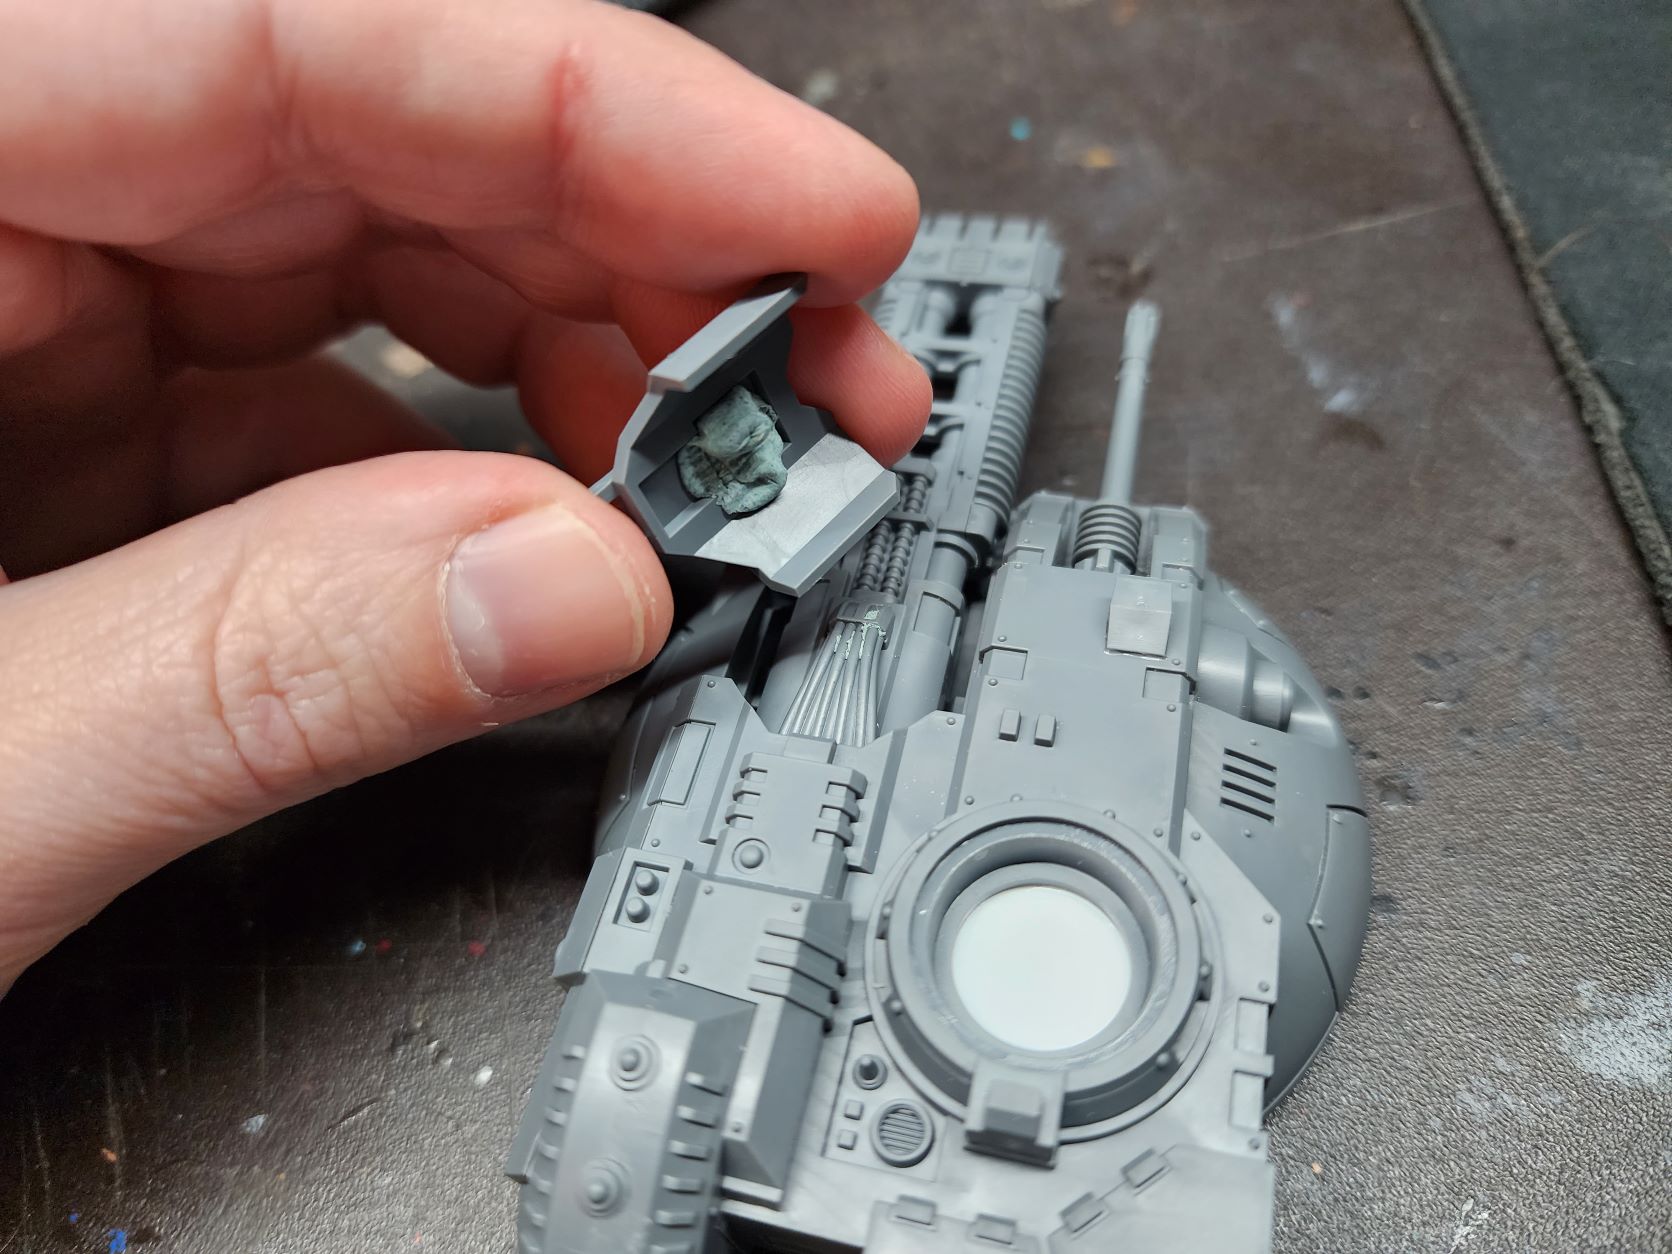
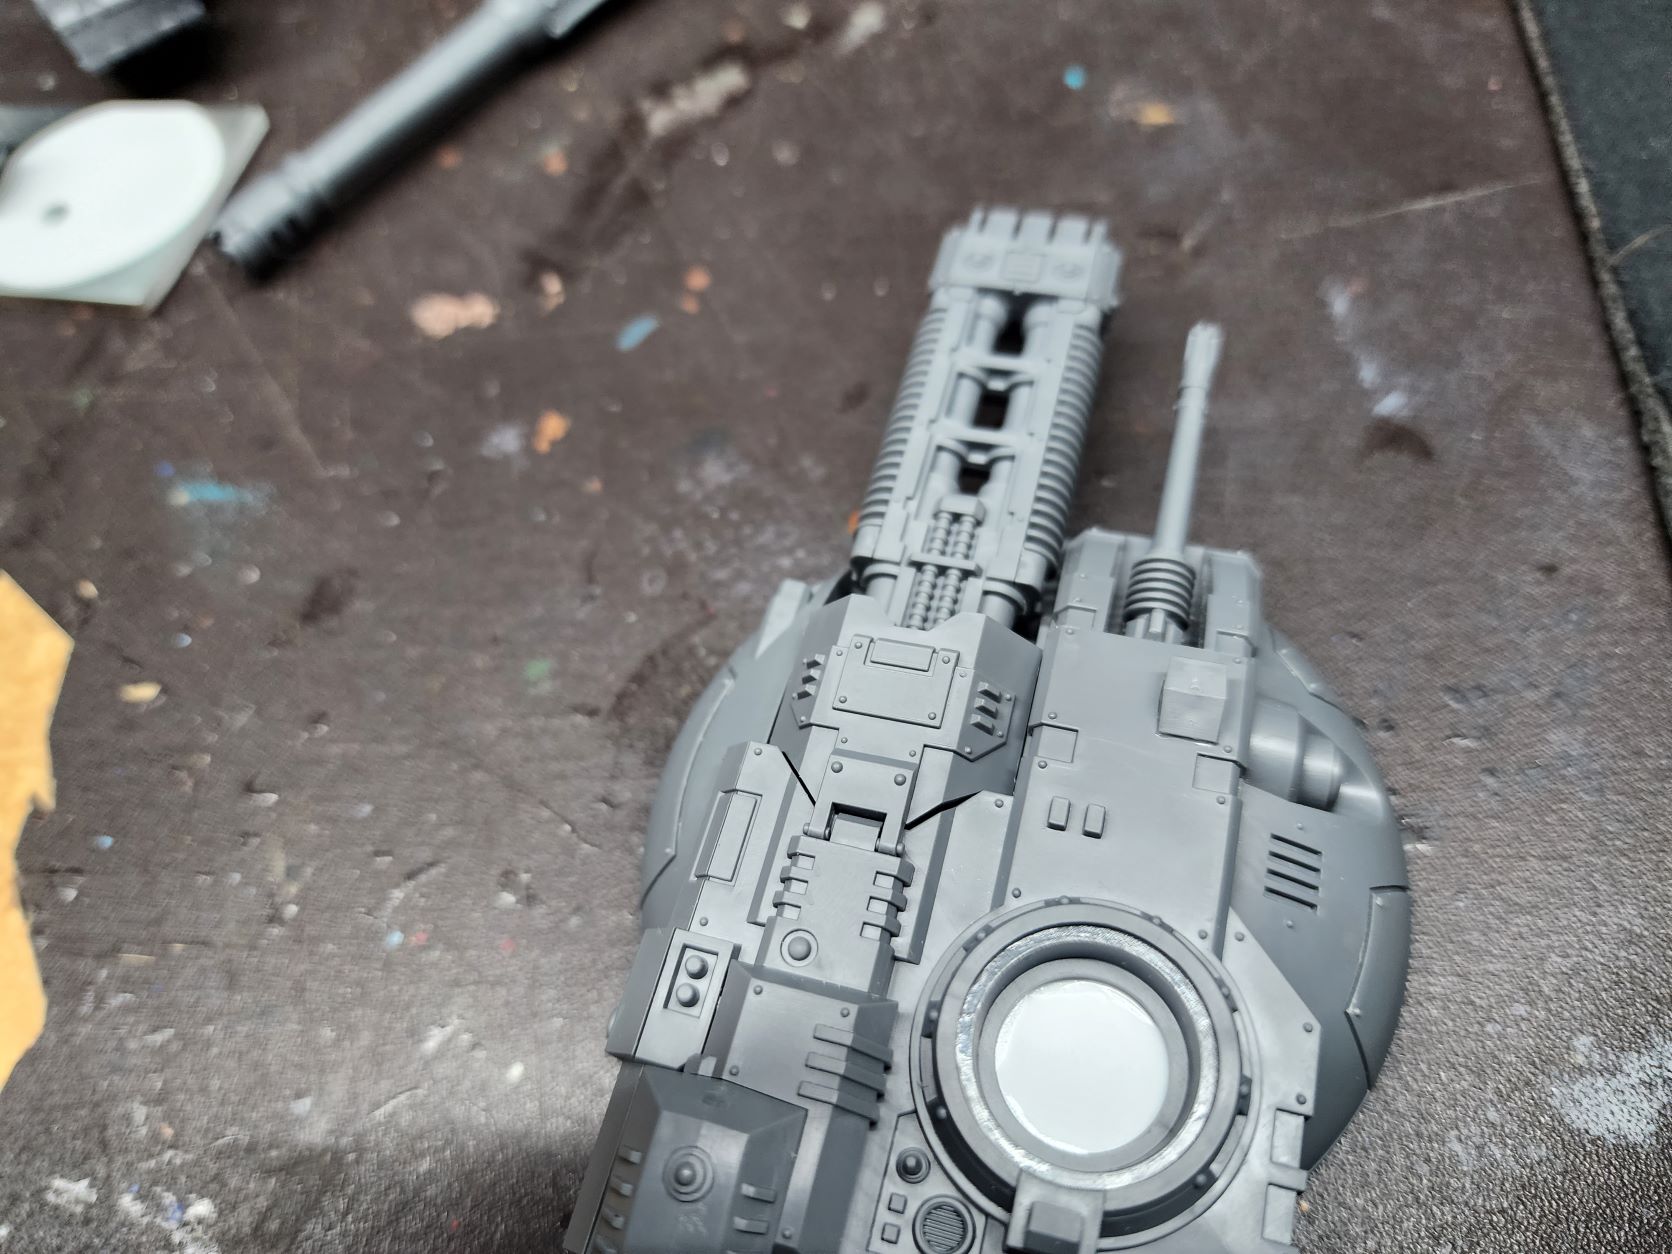
    First the hull weapons. If you are careful about lining up the two halves of the pivot assembly for the hull weapons you can literally just pop them in and out without any modification. I’ve left the top plate of the hull unglued to make getting the pivots painted easier.
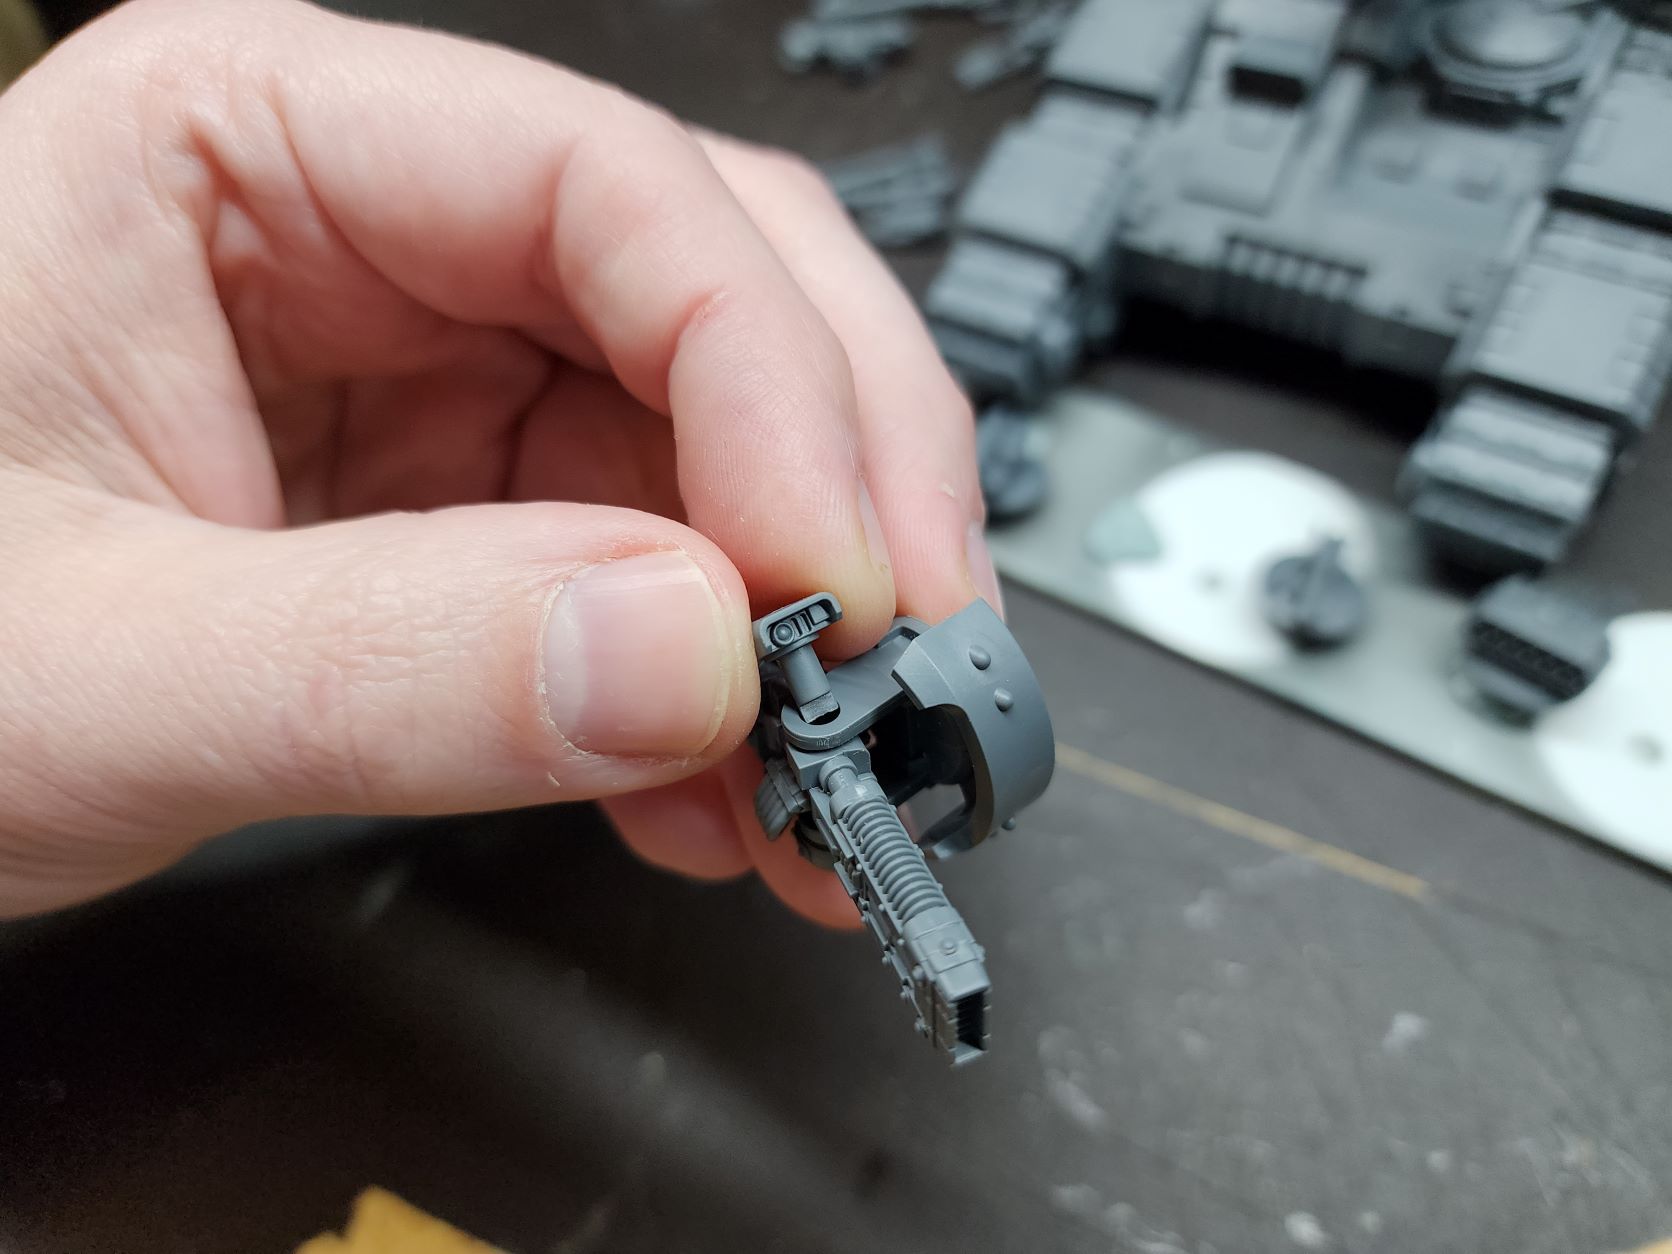
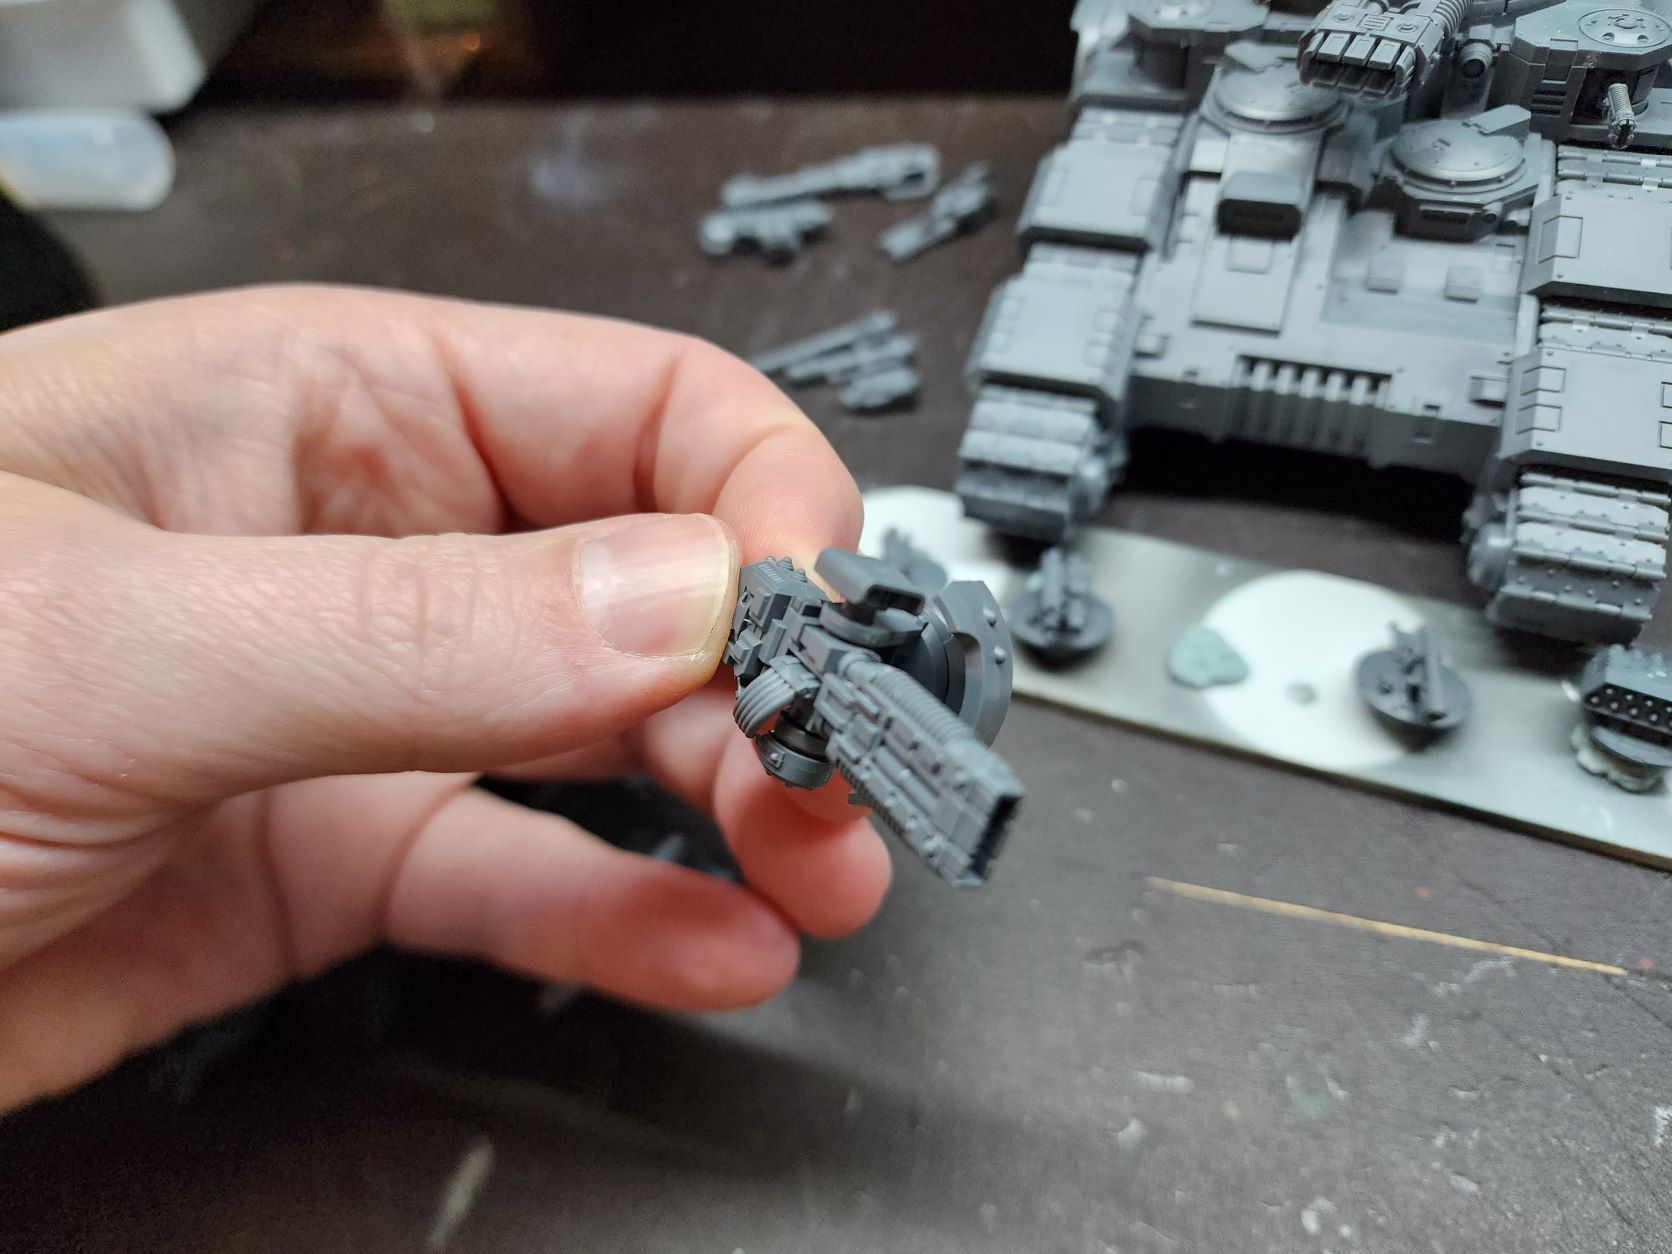
    Hull weapon ‘plug’

    Sponsons

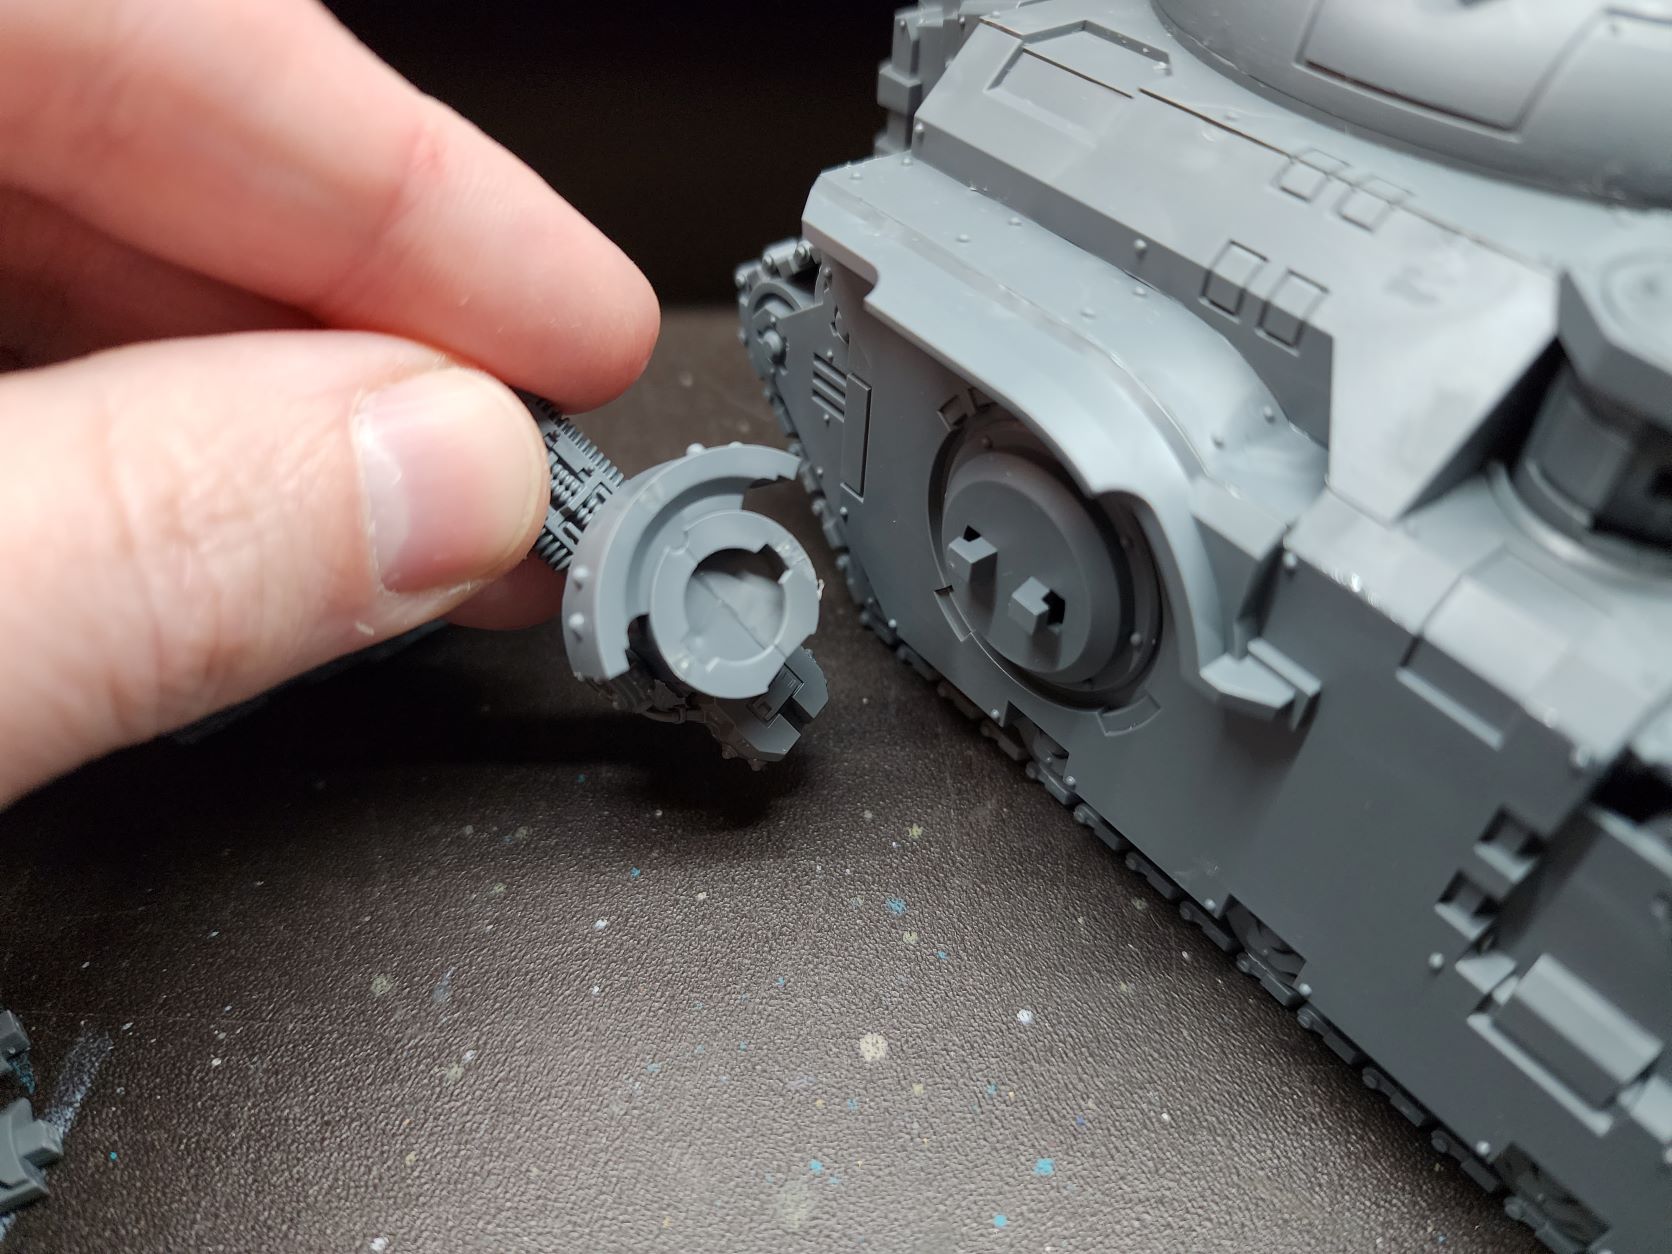
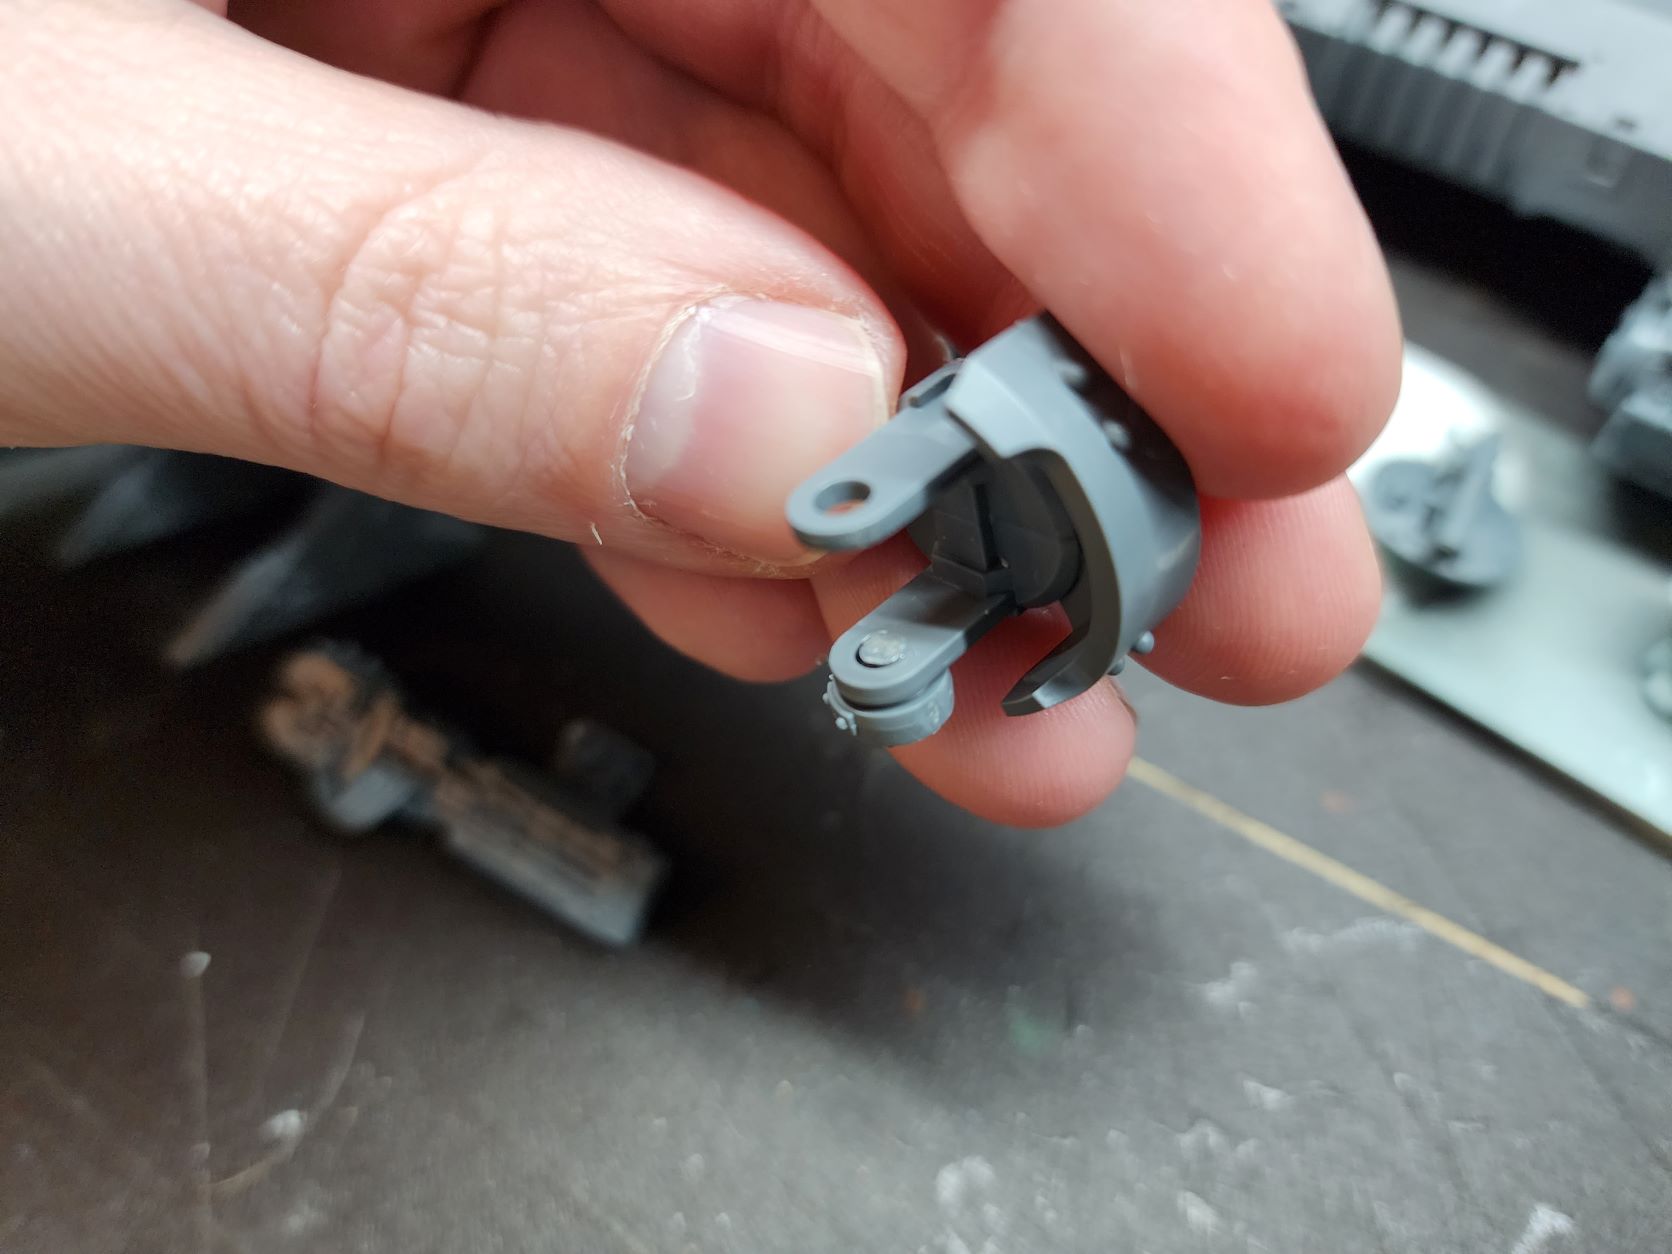
    The sponson weapons have a few different ways to allow swapping out. I did a little digging for how people were going about it and found the simplest and least fiddly method without using magnets. The actual sponson mounts are already designed to be removable (praise the modeler) so it will be easier painting and storing. But there is only the two mount assemblies. The weapons can be swapped out simply non-the-less. Glue the bottom plug in the mounts and snip it flush. Now you can slide a weapon in and place the top plug with the sensor bulb and it will hold very well and the way it is notched makes it pivot with the weapon so it looks good doing it.

    Turret

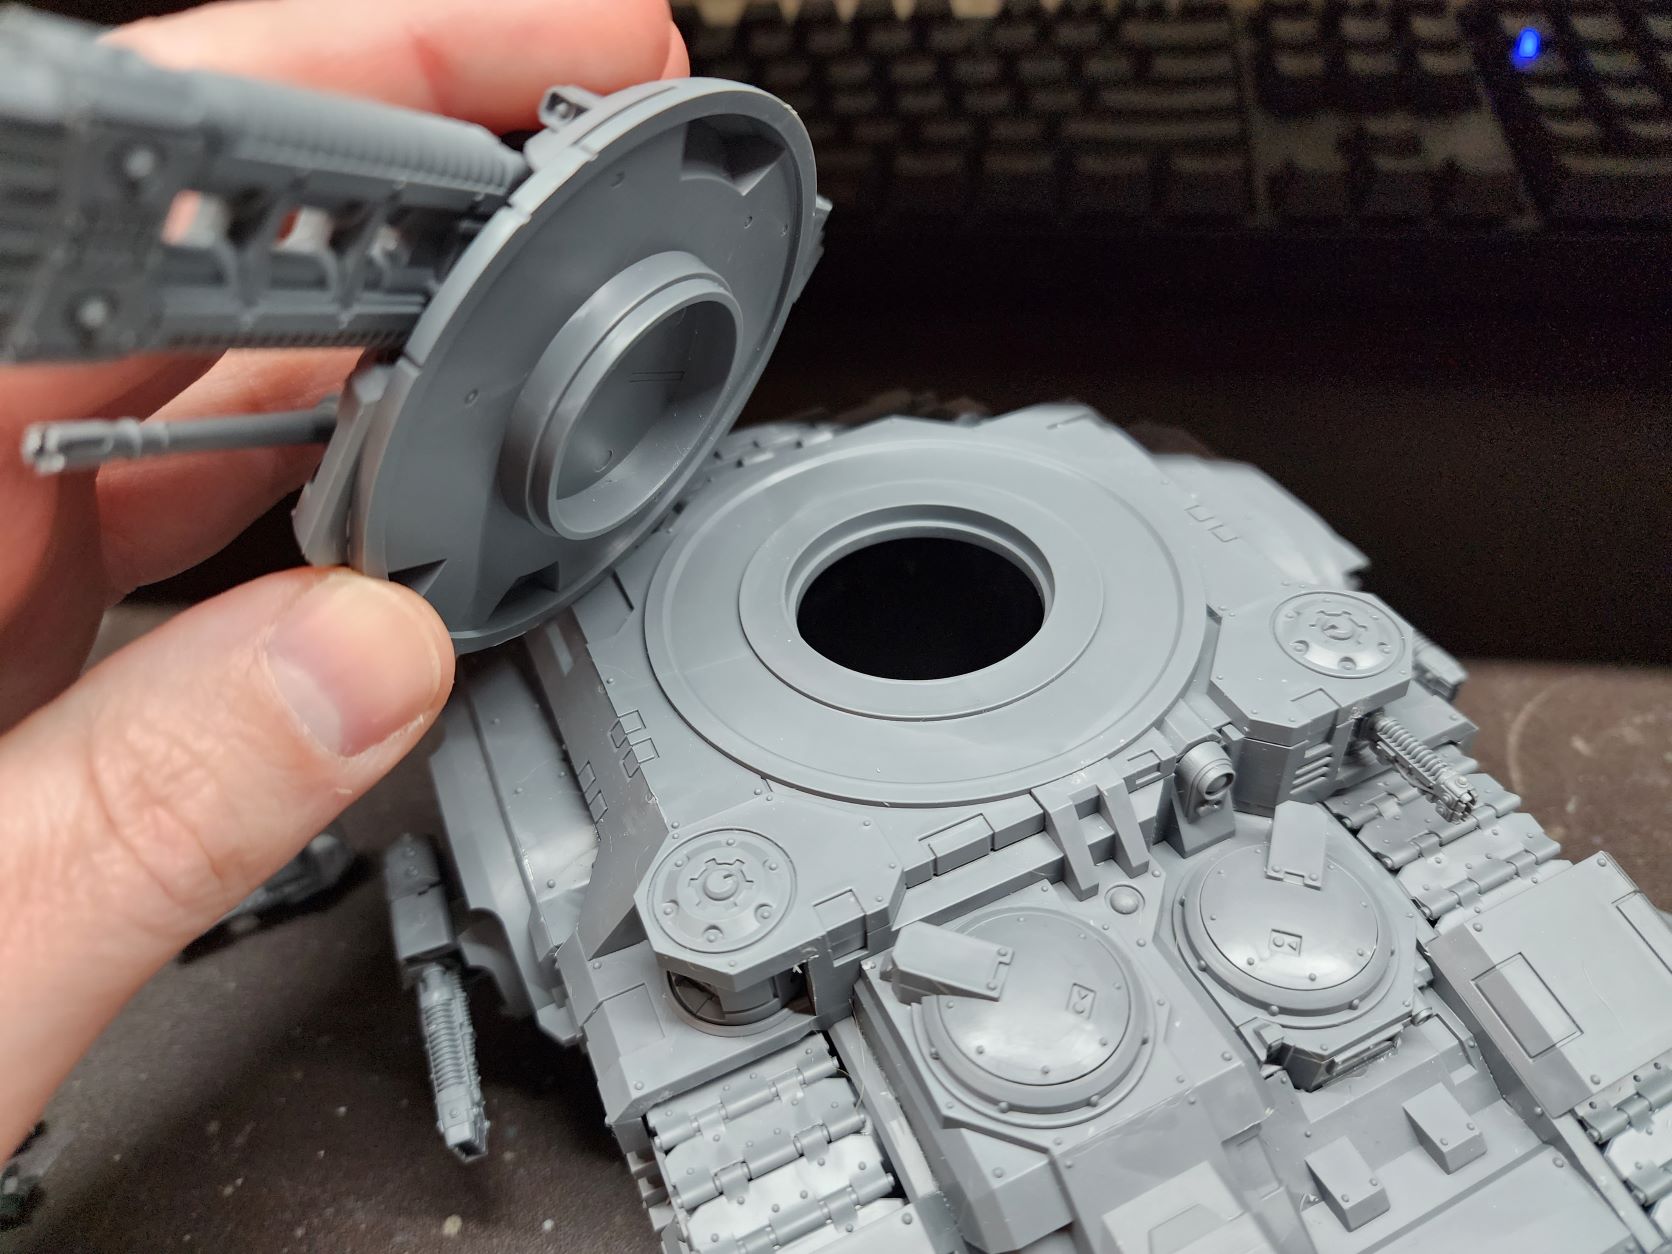
    The turret is really where the designers seem to have put some thought into modularity. If I’m honest they probably could have gone just a step or two further and it would be a no-brainer, but I understand the need to get the things done and not complicate the mold too much.

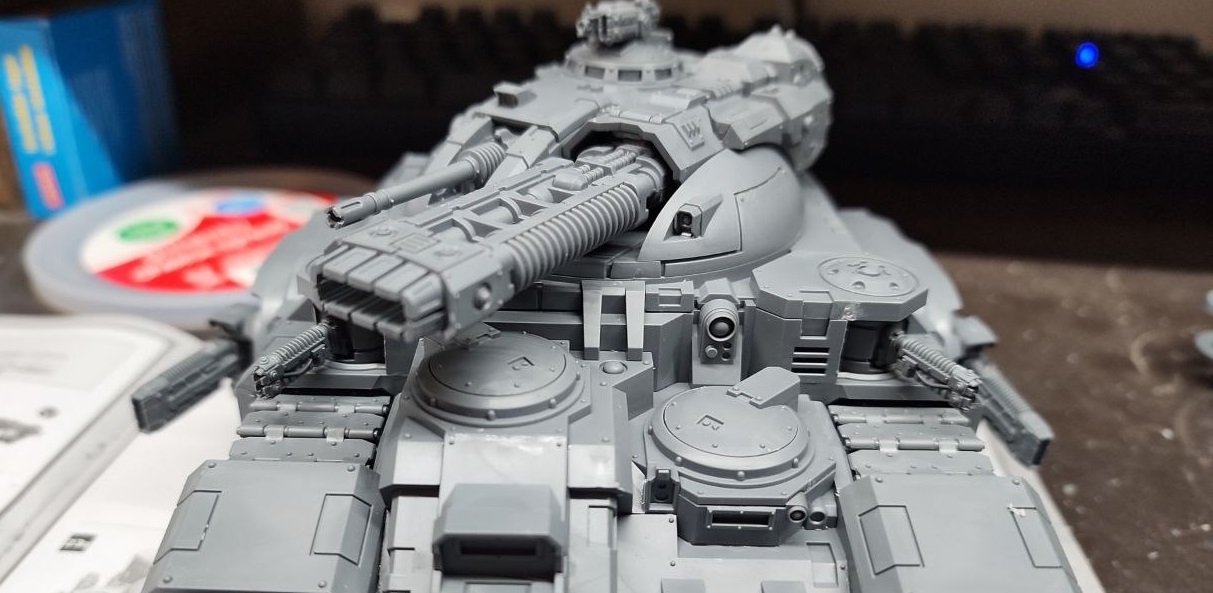
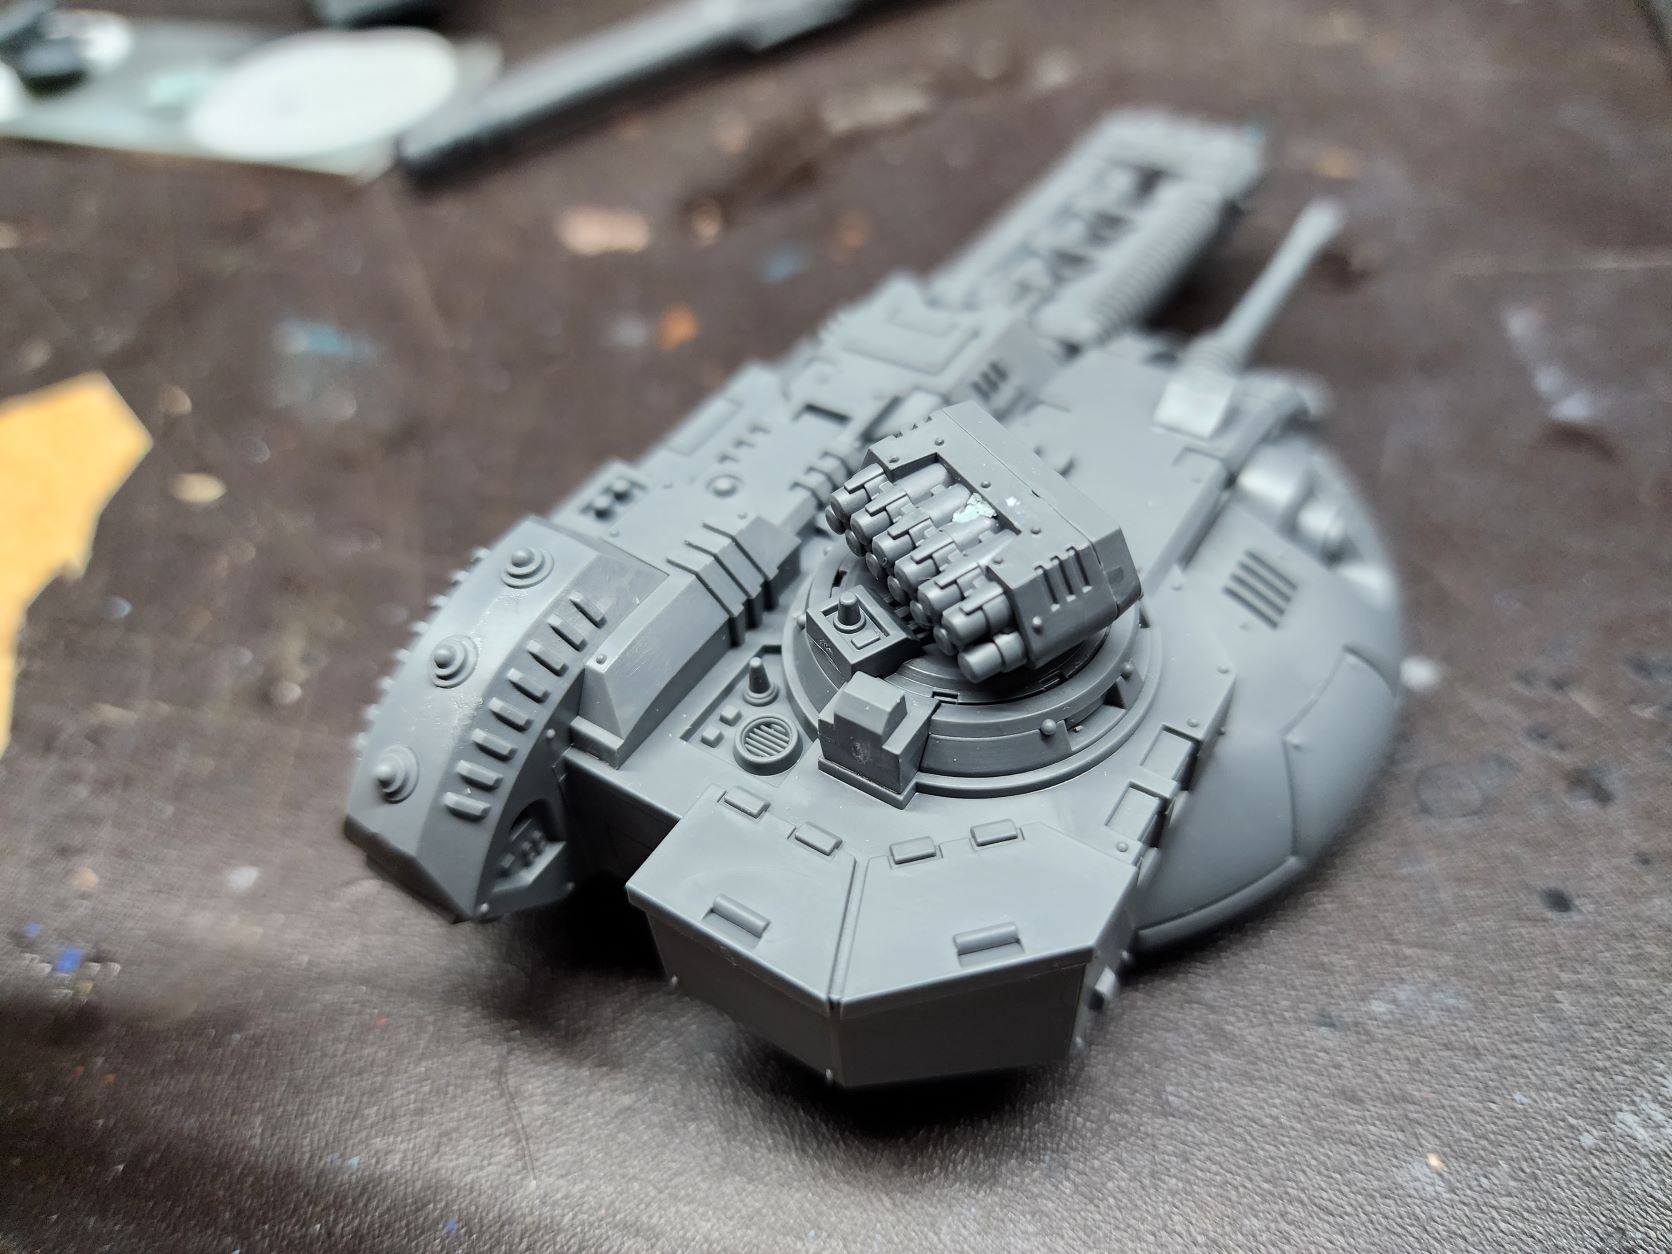
    The turret weapons have pivot posts that allow them to be held securely and yet pivot up and down when the top is glued down. By magnetizing the top plate of the turret rather gluing it you can easily swap the turret weapons. You can also fairly easily magnetize the specific decorative accessories that mount on the back of the turret for each weapon. I’ve opted to just mount the Vulkite one as it looks cool and I will likely be running that most of the time anyway. I’ve seen some do the traditional front loading magnetized weapon on these, but this simplifies things so much without worrying about the weapon seating straight. There are other hurdles with the removable top plate but it is a little easier to adjust as you go. I’ve placed a second magnet far forward beside the gun to ensure the weight of the main gun doesn’t cause the top to unseat at all. It all holds very securely.
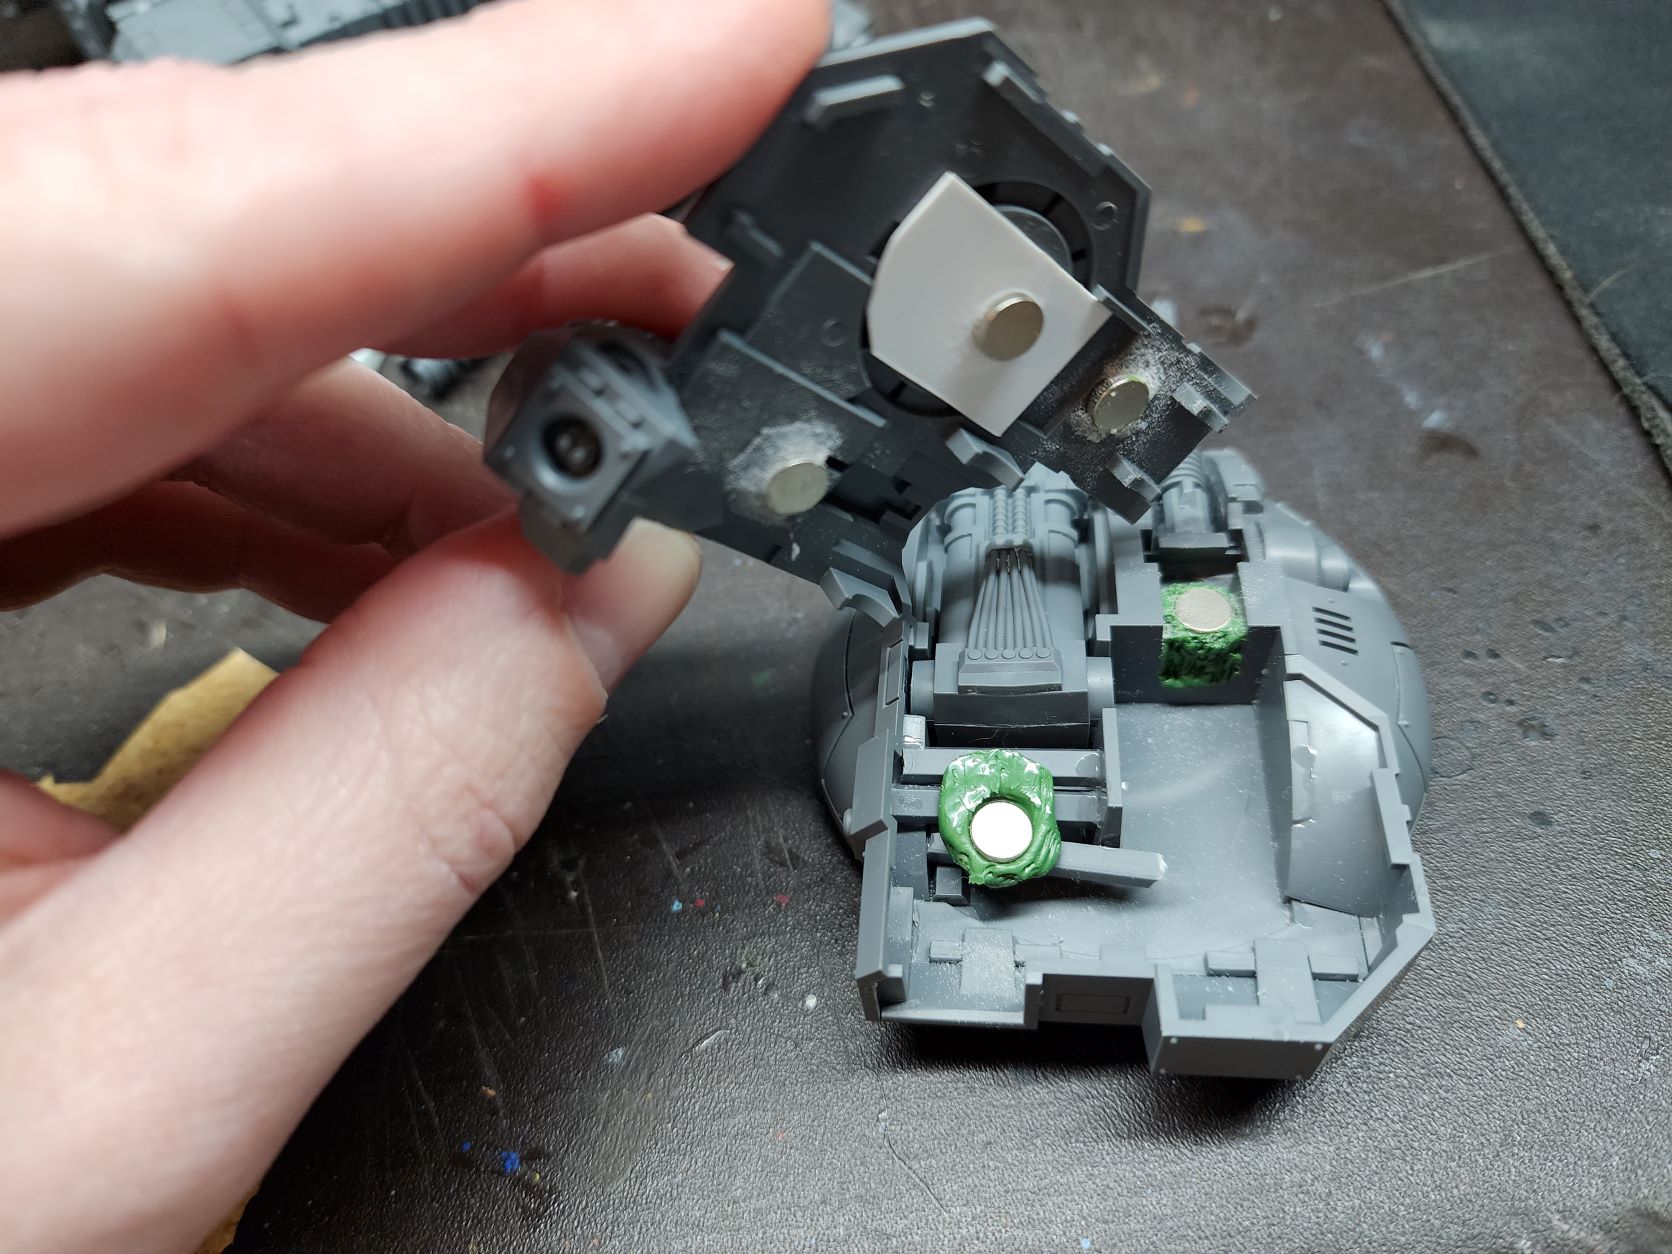
    Cupola

    The cupola/hatch/pintle weapons are pretty straight forward magnetization. A sheet of styrene under the hatch opening with a magnet in the underside. A touch of greenstuff and a magnet to mate with it on each hatch. They gave us 4 hatches and the havoc launcher has its own hatch. So you can have all the options available. The only caveat seems to be that 2 of the hatches don’t allow combi options even though the build instructions and the datasheet in both 30k and 40k don’t have non-combi options. But it is simple enough to imagine a bolter there isn’t it? I’ve opted to not use the marine popping out holding a pintle weapon as this will be used for both my Space Wolves and my Iron Warriors the same as my Landraider.

    Overall, this was a dream of a kit to build. It was so easy and everything lines up perfectly. It is night and day compared to even the recent Primaris vehicles and lightyears better than the old space marine vehicles. It will be tedious getting all the bits painted, but I plant do simple metallic weapons with some red accents to keep from getting bogged down with that.

  • Magnetize Imperial Knights

    Magnetize Imperial Knights

    A little video showing my fully magnetized Imperial Knight Questoris chasis. I used a magnet kit from The Magnet Baron.

  • Brutally Awesome Apps from Brutal Damage

    Brutally Awesome Apps from Brutal Damage

    Since beginning my foray into the world of tabletop gaming, I have consumed a great many ‘Battle Reports’. Otherwise known as recordings, either pre-recorded or streamed, of people playing said tabletop games.

    One battle report producing channel, Brutal Damage, seems to have a rather tech savvy bunch that have designed both a score-clock app and a social media generator. After learning about the app and generator, I took to poking at both and have some results to share.

    Social Media Generator

    The social media generator is rather neat. Just a few tweaks to change fonts and colors and a couple custom template images and you have some easy, branded media to pimp your streams.

    Custom template images, custom font, and handful of edits and BAM!

    In order to use the generator you will need:

    • Python 3.7.1 – I am not going to go into a Pythin tutorial here, there are plenty of others that have tread hat ground before.
    • Image Magic ( x86 or x64 ) – Just install it. The script interacts with it to manipulate the images.
    • Wand Libraries – type “pip install wand” in a command line or Powershell. This is what lets Python talk to Image Magic.
    • Click Libraries – type “pip install click” in a command line or Powershell. Their ReadMe doesn’t mention this, but I had to grab it as well.

    The generator can be found here: https://github.com/brutaldamage/graphic-builder

    Dual Attack App

    The Dual Attack app that was put out by this group is awesome. It is built rather specifically for Warmachine, though. Static time ranges. Can’t change points until Turn 2B. I don’t think it would take much tweaking to make it a tad more generic and work for many games.

    One reason they designed the app was to serve the game state data to a web page that can be rendered in a broadcast application and customized with CSS to fit your overlay. And it works rather well.

    After learning about the Dual Attack app I began playing with it and Open Broadcast Software Studio (OBS). I then remembered how bad I am at CSS. I poked around and discovered they are providing the data to the webpage via JSON. Knowing that, I knew I should be able grab that data myself. So I dusted off my Python (read Google) skill and whipped up a little script to grab the app data and dump them into text files for OBS to pull. It works rather well, even if I do say so myself. There is a momentary blanking of some of the fields in OBS due to what I imagine are read/write collisions. A better programmer might add some protection for such things, but I am not that programmer. I prompted for the IP…isn’t that enough? Here is a haphazard demo of it in action…

    My script is provided at the end of this post.

    The Dual Attack app particulars that thus:

    In closing…

    I have no idea if i will ever put any of this stuff to proper use, but was intrigued by the idea and the potential that it felt blog-worthy. So intrigued, in fact, that i cranked out a whole LargeGeek branded bat-rep setup in OBS…

    And a big thanks to Brutal Damage for sharing these tools and producing solid Bat-Reps! I plan to follow up this post with another post and maybe a video as a crash course in OBS as there are a few quality of life things that are not immediately apparent that I absorbed in researching all this.

    My Script:

    # This is a little Python script to be using in conjunction with the 'Dual Attack' score clock app.
    # It will generate separate files for each piece of data that the app tracks.
    # You can point text sources to these files in Open Broadcast Software to track game state on an overlay.
    # I am by no means an expert on any of this, so do what you will with it.
    # It seems to work well enough for me, with a momentary blanking on OBS when there are write/read collision.
    
    import urllib.request
    import urllib.error
    import json
    from time import sleep
    
    
    svrIP = input('Enter Server IP: ') # Ask user to input server IP
    server = "http://"+svrIP+":8080/data" # Build full address
    print('Currently generating Dual Attack files...\nCTRL+C to quit') # Print instructions
    
    # Main function to do all the work
    def file_gen():
        with urllib.request.urlopen(server) as url: # Look at server and dump json into jdata
            jdata = json.loads(url.read().decode())
            
            #Build individual variables for each json object
            jTurn = jdata["score"]["turn"]
            jTime1 = jdata["timer1"]
            jTime2 = jdata["timer2"]
            jCp1 = jdata["score"]["cp1"]
            jCp2 = jdata["score"]["cp2"]
            
            #Write data to each file
            wTurn = open("turn.txt","w+")
            wTurn.write(jTurn)
            
            wTime1 = open("time1.txt","w+")
            wTime1.write(jTime1)
            
            wTime2 = open("time2.txt","w+")
            wTime2.write(jTime2)
            
            wCp1 = open("CP1.txt","w+")
            wCp1.write(str(jCp1))
            
            wCp2 = open("CP2.txt","w+")
            wCp2.write(str(jCp2))
    
    #Loop to run function or exit        
    try:
        while True:
            file_gen()
            sleep(0.5) # adds a delay so you are writing and polling needlessly
    except KeyboardInterrupt:
        quit()


  • The Tempting World of Tabletop

    The Tempting World of Tabletop

    I have tried many times to compose a blog post describing my journey into tabletop gaming, but they all end up way too detailed and self-important. So here is a bulleted list.

      • Stranger Things wakes family, friends, and myself up to the fact that Dungeons & Dragons is a thing. (this is the part that gets long winded, the fact that I can be so into so many facets of geek culture, but somehow DnD completely passed me by)
      • We dive head first into it and discover a plethora of other games.
      • X-Wing Miniatures brings cousin into wargaming.(Brother and I already owned it, but it failed to alert us to just how big all this was)
      • We both click onto Star Wars: Armada in a big way.
      • The pending release of Star Wars: Legion has us looking into it’s competition.
      • Warmachine/Hordes grabs me big time and we have been going big with that since.
      • Add Warhammer: Age of Sigmar to the list…mostly because of this guy. I always thought the Man-Bat from Batman TAS was awesome, so this miniature is enough to get my attention in a big way.

    Long story short. All this was under our noses the whole time, but there was absolutely no scene in our neck of the woods and every pop culture reference to any of this stuff made it all seem like it died in the 80’s.

    And now here is a bunch of pretty pictures.

    My Wargame Terrain

    Simple wall

    Image 1 of 43

    A bit cartoonish, but it serves its purpose.

    My Warmahordes Miniatures 

    Trollbloods

    Image 1 of 35

    The start of my Trollbloods army from the 2-Player Battlebox


    Star Wars Armada Accouterments

  • Snip

    Snip

    I have somehow managed to avoid using aftermarket, dedicated screen snipping software up until recently. I have happily used Windows’ built in Snipping Tool effectively since discovering it long ago. After a recent bout of troubleshooting a plug-in at work that required multiple rounds of screenshoting repeatedly to document errors and such, Snipping Tool’s biggest flaw finally got to be enough for me.

    That flaw is the need to save each shot as you do them. And on top of that, it does not randomize the name so you risk overwriting if you are in a rush or delirious from hours of running the same plug-in over and over. There are a lot of free and paid third-party screen capture apps. Most don’t really address my hang-ups with Snipping Tool satisfactorily. While others are way too heavy and try to do more than I need from screen capture software.

    So I really dug into the options and turned up Snip. It is from the Microsoft Garage, so as close to first-party as you are gonna get until they decide to replace Snipping Tool with it. It is really lightweight for all that it does. It’s other functions don’t get in the way from the basic snipping functionality I need. And it automatically caches snips as you go so there is no need to creep through tasks that require a lot of snips. After installation it automatically maps to the Print-Screen key. Pressing Print-Screen freezes your screen and allows you to snip a whole window by just clicking. Or you can select just the area you want with the cross-hair cursor it gives you. It then brings up it’s main window allowing to markup the snip and saving the changes or you can go about your business knowing that it has cached it in its own library for you to deal with later.

    I know there is a plethora of these apps out there, but I really like the idea that Snip is first-party. I hope the Windows team eventually sees fit to at least bundle Snip into Windows, if not outright replace Snipping Tool with it.

  • The Sound of Music

    The Sound of Music

    Recently Google, or more specifically the Chrome team, removed the ability for the Backspace key to go back a page in Chrome. This proved to be the final shot in the ground war Chrome has been fighting with their most enthusiastic users. They removed this functionality by default with no way to restore it. No flags. No options. There were quickly third party extensions to restore functionality, but I was incensed and did not see why I needed to add an extension to make my browser do something that browsers and other software (including Windows File Explorer) have done for the better part of 20 years.

    Time for a new browser.

    I used to be a fan of Firefox and keep it installed for emergencies, but have not liked the direction that they have gone. Edge and Explorer are out of the question. Opera…intriguing, but not quite there.

    What is left? Vivaldi. I had tested Vivaldi when it went public. It was rough, but reminded me of the hay day of Firefox when you got just the right plug-ins. A little bit of trivia…Vivaldi is founded by one of the founders of Opera. So I decided to dive right in and live with it as my daily driver.

    After reminding my self that it had intrigued me so I realized that Vivaldi seemed to answer all of my qualms with Chrome while bringing along Chrome’s renderer and extension library. The only piece of functionality I lost by switching to Vivaldi was syncing bookmarks. This was easily solved with XMarks. And don’t try ti argue that I am a hypocrite by using an extension for bookmark sync, but refusing to use one fore Backspace in Chrome. Bookmark sync is a relatively new notion in browsers and in my mind is not a core feature. And it is handled well with extensions. Also, sync is on the list for the devs and it will come in time. Backspace had been around for two decades (maybe even longer…I am just counting the usage I have direct knowledge of). And Chrome has no keyboard shortcut options built in…at all. You use it exactly as the devs say you are to use it. I have grown tired of that mentality from Google.

    Vivaldi on the other hand has very thorough keyboard shortcut options. You can assign just about whatever command to just about whatever UI element you please. And it is easy to use. Vivaldi also bundles in a ton of functions that one used to have to pile on with extensions. I could go on for hours about all the little things Vivaldi allows that Chrome just plain doesn’t or requires extensions for, but I wont.

    Sufficed to say, I have been using Vivaldi on all my machines since the day of Backspace-gate and I have not looked back.

    Disclaimer…not that I need it: I have not been paid or endorsed in anyway by Vivaldi. I am just a fan whose love of their product is exacerbated by my mistreatment at the hands of their competition.

    Update 2017-04-29: I have since started exporting my actually bookmarks file from AppData to sync my bookmarks from work via DropBox. X-Marks was making a huge mess of things as it was not designed explicitly for Vivaldi and was assuming Chrome’s Bookmark architecture. All this may seem cumbersome to most, but my bookmarks change very rarely as I tend to document most project related links in OneNote or Keep.

    Update 2020-04-28: Even though Vivaldi now has bookmark sync and a mobile solution, eventually moved to Firefox and use it on all platforms. I still suggest you give it a spin and there are still some things I prefer in Vivaldi, but Firefox seems to be getting the job done. Though there are some recent UI elements that Firefox has pushed without the ability to disable that might drive me to give Vivaldi another chance. Chrome is still a bloated piece of shit that can’t get out of its own way.

  • Lenovo Thinkpad X260

    Lenovo Thinkpad X260

    As the ‘first-call’, ‘boots-on-the-ground’ IT administrator for the family of companies I work for I need a dependable and flexible laptop.

    My Dell XPS 12 (2012) has served that role competently since I purchased it at launch. It’s tablet-like functionality is pretty nice in quickly navigating through many tasks. Then you have normal laptop input when more nuance is needed. Where it eventually fell short is not having a built-in Ethernet port, forcing me to use awkward dongles. Boy those get old after a while. It was also very top-heavy as a laptop, and even on a flat surface wanted to tip backwards. And on top of all that, the Ivy Bridge processor was just not as power efficient as I would like especially with the ground that Haswell and Skylake gained in that arena.

    Dude…you’re replacing a Dell!

    So the time came for an upgrade. My criteria were very simple:

    • Generic laptop/notebook form-factor. No hybrids or convertibles.
    • Built-in Ethernet.
    • No heavier than 3 Lbs.
    • Greater than 720/768 vertical resolution. Some WebGUIs I deal with are hard to navigate on lower resolutions.
    • Must fit in my beloved Macbook Air Wallet from Waterfield Designs. So not larger than about 12 in, depending on overall design.


    Turns out there are very few machines that meet all these criteria. The hardest thing is finding machines with built-in Ethernet that are not either bulky or cheaply built. Much less in the size range I needed.

    After much searching, I ended up at a machine line that I had drooled over before. The Thinkpad X200 series. It just so happened that Lenovo was releasing the Skylake based X260 soon after I began searching early this year. Initially, they were only offering a 768p screen, I bided my time and eventually they opened up customization and offered 1080p IPS screens. So now it met all my criteria! I saved a little coin by not splurging on the SSDs that Lenovo offered and decided to install a spare ADATA SP600 I had from my TestCore turned FreeNAS.

    The configuration I decided on was:

    • Intel Core i5-6200U
    • 8GB DDR4
    • 12.5in FHD IPS Non-Touch Display
    • 500GB HD 7200RPM (replaced with the aforementioned SSD)
    • Intel 8260AC+BT 2×2 vPro

    Shock and Awe

    I have had a little hands-on time with IBM and Lenovo Thinkpads. I think the best way I could describe them is reliable and confidence inspiring. Even not knowing anything about all the work they put into making sure that anything with ‘Thinkpad’ on it will live up to that name…you can just tell that this machine is a tad better that the other guy’s. Some might question my decision to go Lenovo with all the spyware and security drama. Not to mention the fact that they are slowly running the Motorola name into the ground. Most of the drama was around the Superfish spyware that came bundled with the Ideapad line and never touched the Thinkpad line (Consumer vs. Business). That is just real poor decision making that every OEM has or is doing on some level. My doing a fresh install on the SSD solves all the crapware problems that one might find with any OEM. Then there is the Lenovo Service Engine drama that was blown way out of proportion. They were utilizing a method of installing support software via the BIOS that Microsoft provides in Windows. This software installs even on fresh operating system installs. Microsoft changed their policy on using this method after learning how fully OEMs were using this and Lenovo ceased doing it and release a patch to prevent it from running after install. This is similar to how connected Windows 8 and 10 are. How Microsoft wants feedback on everything people are doing with the OS. I understand the desire to want as much feedback as possible to improve your product and ensure returns on a very low margin business. These are multi-billion dollar companies. They do not care about your personal data. They just want to know if you tend to hit this button or that. Or how often you run a particular app and how you launch it. Sure we need to take them to task when we catch them being irresponsible with the collection of this data and Superfish was a huge overstep, but they have a legitimate claim in wanting an eye into the usage of these systems.

    Anyway, I was not deterred by the controversies surrounding Lenovo. And I am so glad I wasn’t. I love this machine. It serves my purposes so much better than the XPS12 ever could. It fits in my bag a tad better. It is lighter. It has physical mouse buttons. And most importantly…it has Ethernet.

    IMG_0191

    Build Quality

    While it is not build as tank-like as Thinkpads of the past, it feels very solid and mine does not exhibit some of the QC issues that some on the Thinkpad sub-reddit had seen early on. Even after taking it apart to install the SSD, all the seams are tight.

    Keyboard

    The keyboard feels a tad better than the XPS12. I am not privy to the more luxurious notebook keyboards out there, and am not composing novels on it, so the keyboard is not a huge category. Of more concern is the actual keys available, and it is even better than the XPS12 in that department. Namely no need to hit function for Home, End, Page-Up, and Page-Down. And NO BACKLIGHT! I hate backlights on keyboards.

    Screen

    The screen is a 1080p semi-gloss IPS screen. It looks good and deters glare well enough. Much better than the glass touch-screen on the XPS12. The initial run of the XPS12 came with a really bad IPS screen that suffered from what appears as temporary burn-in. I see no anomalies with this screen at all.

    Touchpad/Nubbin

    The touchpad is the best Windows one I can remember using in recent memory. I think there was a nicer HP I worked on in the early Windows 8 era that might be the best ever, but I fail to remember the model. Another bonus is that it has physical mouse buttons. That is getting rarer and rarer on all but the clunkiest laptops. I am new to having the nubbin at my disposal. I always made a point to try it when I found myself in front of a Thinkpad or Latitude and could see the utility. I find myself using it about 20% of the time.

    Verdict

    So I guess you can tell I am very satisfied with this machine. It might not be the pinnacle of the Thinkpad name, but I think it carries the torch well in its own ways. It does come in at a much friendlier price point than if they had tried to build a tank. I think some of the material decisions and construction methods make for a rugged, yet unassuming package that suites its place in the modern PC market perfectly. And like most of this article rants on about…there just aren’t a lot of machines in this category and I think it is laps ahead of the competition.

  • From Test-bed to Data-dump

    From Test-bed to Data-dump

    In preparation for testing Windows 10 Betas last year I built a tester rig that was equipped enough to morph into a primary rig for someone or server of some type.

    • Intel Pentium G3258 (Unlocked Anniversary Edition)
    • ASRock Z97M-ITX/AC
    • 8GB DDR3 @ 1600MHz (2x4GB sticks)
    • ADATA SP600 128GB SSD
    • SeaSonic SSR450RM PSU
    • Thermaltake Core V1 Mini-ITX case

    Sure I could have just used visualization to test Windows 10, but I really wanted to see how it behaved when properly installed on dedicated hardware. And I wanted an excuse to buy more hardware. I did have some ideas for it’s implementation as a guest gaming rig or NAS or even selling it to a particular family member who never seems to want to pull the trigger on re-joining the PC Masterrace.

    Time to move on

    Well It has been a year and Windows 10 has officially rolled out. So the need for a test rig has passed. I could keep in on Fast-Ring builds and toy with them, but I really wanted the hardware put to better use.

    My need for real, dedicated local storage recently saw a sharp increase due to a few factors:

    • I am now re-ripping my music library to FLAC and would like have some redundancy in their storage.
    • I have subscribed to ITPro.tv and am able to download their lessons. I need more room for those if I plan to keep them for posterity.
    • I had my storage drive in my main rig fail. Which woke me up to pitiful state of my back-up strategy for a person as knowledgeable as I am.

    Shark-bit

    I have shopped around for NAS’s on and off for a long time now, but never could bring myself to pull the trigger. Each of the major machines in my house have large storage drives and the most important, not easily replaceable data is duplicated either by hand (for static data like ISOs) or through SyncToy (for dynamic data like game server back-ups). My personal data us handled by Jungledisk as a previous post details. But my need for a large amount of storage and fear of these drives failing escalated recently so I started looking really hard at my options. With the TestCore being freed up, I started leaning really hard toward turning into a storage box.

    And the best option I knew of for such a task was FreeNAS. I have actually played with FreeNAS in the past on a netbook. Just to see what it was all about. I had seen it mentioned quite a lot around the web, but it came to my attention for real when a large update to it making more n00b friendly had it being featured in many blogs and podcasts I frequent some time last year.

    So in light of recent events, I turned to it again. Got it installed and tested things out with the SSD I had in the box already. Everything worked marvelously. I just had one issue…The Thermaltake Core V1 is not a NAS enclosure. It has 2 3.5″ HDD mounts. A little Google-fu and I was lucky enough to discover the crew at HDCP unlocked some hidden flexibility of the Core V1 by mounting drives to the vent holes on the side panels. I was able to cram 4 3.5″ HDD’s and the SSD into that little case while still keeping my Cooler Master TX3 tower cooler. Due to large 200mm intake fan and relatively beefy CPU cooler it runs really quiet. Am running the case fan at a normal curve and the CPU on a silent curve as it won’t be all that busy and is currently not overclocked.

    Crowded yet cool interior.
    Crowded yet cool interior.

    A test fit of the hack with 2 random drives.
    A test fit of the hack with 2 random drives.

    I am technically not where FreeNAS likes you to be with my hardware. With my 12TB of storage they would prefer 12GB of RAM and ECC at that. I have regular non-error checking RAM and only 8GB of it. I am running the drives at ZFS level 2 so I can lose two drives. All that said I am not seeing any detriment to performance and with this box serving more as cold-to-warm storage I don’t think it will be too unhappy in the long run. I also have email alerts set up so I will actually know when things are wrong. Also got it set up on my pfSense box after setting up an account via this domain for them to use. And I do have it on a UPS (ZFS golden rule).

    After a delightful mix of need, inspiration, knowledge and ingenuity I have gotten a rather decent little NAS put together. It has been in 24/7 service a a little over a week at this point. And was in a couple weeks of testing prior to that. I have also been playing with jails and cementing my FreeBSD skills. I am familiar enough with it from my previous Linux experience and from playing around with the it in virtual machines a time or two. I also have some real experience with it in the form of my pfSense box which also runs on FreeBSD.

    And after all this I have some advice. Use FreeNAS wizards! They are there for a reason. I followed a myriad of tutorials on properly setting up CIFS(Windows) shares and they all had a mix of what was and wasn’t required and none of them allowed me to reliable access the share. I finally blew thing away and used the wizard and access has been seamless. Similar to certain tasks on the Sonicwalls at my job. Yeah, you can go change the 6 things there are to change to open a port and slam your head on the desk when it doesn’t work…or you can use the wizard have it actually work.

  • Zalman ZM-VE300 drive enclosure, miracle worker Review

    Zalman ZM-VE300 drive enclosure, miracle worker Review

    Of salt and memories

    Any geek worth his salt has had to boot a PC or a hundred from a USB flash drive to repair, recover, or re-install. Those that are REALLY worth their salt have put many a flash drive to pasture from repeated ISO unpacking. Being the resourceful geek that I am, I run around with a multi-boot utility on a flash drive that allows me to boot into any number or tools and operating systems. My utility of choice is YUMI. One drawback to it is that you can only have one Windows install available at a time, so I still abused the memory quite a bit due to my having to work with everything from XP to 8.1; throw in 32-bit and 64-bit variants and you have a lot of unpacking still. I solved this problem somewhat, by switching to a 500GB portable USB drive. A spinning disk can take the abuse much better and is actually faster for writes than the cheapo NAND and controllers you find in run of the mill flash drive. However, I found that many machines that I work with end up not being able to boot from my USB-HDD at all. I needed to find another way…

    Enter the Zalman ZM-VE300. It first came to my attention in a video covering Zalman’s booth at CES 2014. And a later review by the same people. It is no normal portable drive enclosure. The VE300 can emulate an optical disc drive (ODD) and mount one of any number of ISOs that you store on the enclosed hard drive. There are 3 modes to optimize for different use cases: HDD, ODD, and Hybrid. HDD mode makes it behave like any USB HDD and lets you access storage. ODD mode emulates an DVD/CD-ROM drive and lets you select an image to mount and boot/load. Hybrid mode exposes both ‘devices’ to the system. You select the modes with a jog dial the flicks up & down, and select items by pressing it in. There is a ‘Back-Up’ button that interacts with Zalman’s bundled back-up software and serves as a back button in menus.  The back-up software will not be discussed here as I have no need for in my use case of the enclosure. The ISOs are stored in the root directory of your drive in a folder that you label “_isos”. The rest of it can be used for whatever storage needs you have.

    IMG_0079_editedI will answer the burning question of whether the drive ‘does what it says’ up front…YES!. It has booted a number ISOs on a handful of machines that I tried it on. Only one PC failed to play nice with it; my old Dell e1505 laptop. It recognized something was plugged in, but complained that no OS was present. Every other PC loaded the selected ISO without any complaint. There is a trick to getting things going though. You need to enter either a boot menu or BIOS screen to allow the drive to be powered but idle. This is so you can select the correct mode and ISO to boot to. On most computers it is best to do this anyway rather than hope it is setup to boot willy-nilly from any random drive thrust into it. Once you have selected a mode and ISO you just select the Zalman from the boot menu or restart if you went to BIOS and maybe enter the boot menu if you couldn’t change the boot options to prioritize it. If all goes well, your selected ISO should load as if it was sitting in the disc drive. I opted for a Crucial M500 SSD to occupy my VE300 so this goes ridiculously fast. I chose an SSD to avoid moving parts. Memory wear will be minimal as I will not be using it for storage, only multi-booting. I still have the my 500GB portable drive for storage and recovery dumping.

    A grain of salt

    It wasn’t a painless endeavor turning this beauty into a multi-booting beast. Long story short, I had to end up pre- formatting the SSD before using it in the enclosure. A problem that might have been quickly solved by another man, but it took an off hand mention in a YouTube review/tutorial to guide me to the solution. Nowhere in the limited and highly visual manual or any other documentation did it mention that you might need to format your drive prior to insertion. This could be a big speed bump to even a slightly lesser geek that might lead them to believe they purchased either a bunk drive or enclosure. I will have to drop a suggestion Zalman’s way on filling out that manual a little. And if I am going to knock it on anything else…I think the dial needs to be rethought. It just feels chinsy and really cuts down on the fit and finish. I don’t see it standing up to too much manipulation, but I hope I am proven wrong. Some other reviewers might knock it for its interface, but I like the dead simple UI. Hard to get lost or screw anything up.

    2014-03-03 17.53.50_edited

    But you can never have too much salt

    With all that said…I freaking love this thing. It solves a huge problem that I run into repeatedly in my professional and private dealings with computer repair. Short of the odd PC that doesn’t play nice, it allows me to instantly boot any install disc or recovery tool or password reset or memory test that I need for a particular task. No more fumbling around getting the right assortment of install image and tools,; all the while eating through the life expectancy of my flash drives. I of course still carry a couple flash drive with a few select tools on them so I can leave them running for extended virus scans or SpinRite sessions, but the ZM-VE300 it never leaving my go bag.

    UPDATE (08/01/2014):

    Felt the need to reiterate how ridiculously useful the VE300 is. What blows me away more than anything is that this isn’t even a product category. It ,and it’s variants from Zalman, seem to be the only devices that serve as a virtual optical disc drive that mounts on-board ISO’s. There are no other such devices that I could find in my research. And it is not like they are perfect. There is the finicky setup and the industrial design could use a closer look. Sure, people aren’t demanding such a device, but I have never seen a device with zero competition. These facts don’t make me love the little guy any less, though. Since writing this review originally it has proven invaluable in cleaning, restoring, and troubleshooting a plethora of machines. Still a must buy!


  • It is a Jungle(disk) out there!

    It is a Jungle(disk) out there!

    ...or OneDrive to fail them all.

    I am through and through a “Windows guy”. There was a time when I might have identified as a “Microsoft guy”. Recent events have made me rethink the latter.

    While I am not necessarily an early adopter in most respects. I did jump on the could storage band wagon relatively early. First Dropbox, then moved to SkyDrive for the majority of my syncing needs. I moved to SkyDrive for the both spoken and unspoken promise that it was going to be THE place to store your ‘life’. And hoped that more compatibility and functionality would eventually show it to be better than third party apps.

    With Windows 8.1 a glimmer that future shown in the fact that SkyDrive was rolled into the OS as a not so integral part. And many people including myself that upgraded to 8.1 soon found that SktDrive just was not syncing on those machines anymore. There were a myriad of symptoms and temporary fixes. In my case it took a ‘Reset’ of Windows through the Recovery options (basically a clean install). I was only able to do this because I have TechNet, so I actually had the 8.1 ISO that it started demanding when I tried to perform the ‘Reset’ (most people would have to re-install 8.0 then upgrade again). The idea of a clean install was not too bad for me as my games and other large media exist on a separate storage drive.

    SkyDrive was fixed, but like anything that causes a re-install of your OS…it put me solidly on the fence. The fatal blow came with the recent update that added some functionality and re-branded it to OneDrive. I quickly found that my main machine was no longer syncing and certain settings would reset after every other restart of the PC. I went through every solution I could find and ran their troubleshooter more times than I care to admit and did find what ended up being a temporary solution in resetting the cache (run “skydrive.exe /reset”). This would make things work for a few restarts or whatever and then fail. I gave up and decided to look for another solution for cloud storage/syncing.

    I have always had JungleDisk in the back of my head as back-up solution since I heard about it from Steve Gibson on his “Security Now” netcast on TWiT.tv. I thought about plunging back into Dropbox or switching to Google Drive, but after thinking over my needs and wants the more robust JungleDisk seemed to make much more sense. And the only reason SkyDrive was free for me was because I was granted the free 25GB for being in early. The other ‘free’ options would end up costing me anyway for the size of my sync folder (around 23GB and growing).

    I have subscribed to JungleDisk’s Personal Desktop Edition service and am just about done getting my sync folder uploaded. Also have it down-syuncing to my work machine. So far it seems to be working…unlike OneDrive…and that is worth every penny. JungleDisk is also mainly a straight-up backup service so I can actually start rethinking my back-up strategy. Already have a few back-up jobs lined up, but am holding off until the sync folder is done (Windstream’s 768Kbps upstream takes a bit). I also like the idea of the ability to look at your cloud drive as a ‘network drive’ for machines where you either don’t want/need all the data of the sync folder, but want access to it. OneDrive allows some granularity similar to this, but it is more in the background and hands off. I will be utilizing the ‘network drive’ feature on my XPS12 as I really don’t need any of that data, except the odd time I need to access an internal document. Another huge plus for me is JungDisk’s Activity Monitor which lets you micro-manage how it behaves.

    This post might be a little premature, but I am so pleased with JungleDisk so far that I couldn’t wait to compose it. In my research I found many sites that knocked JungleDisk for being a bit too complicated. Most of those reviews were done for the benefit of ‘normal’ people and that is expected. Well, pending any speed bumps in the coming months you can take this geeks word that JungleDisk is a 10/10.